Friday, May 28, 2010

So close......

Take a look at this dress. Anything strike you as being not-quite-right? Something which if done a little differently would make the design sing instead of hum quietly in the back row?

Here's the back. Spotted anything yet?


No? Bugger. It's only me who thinks the topstitching is too wishy-washy? I really really really need to get over myself? Yeah, thought so. (In my partial defense, I had a hell of a time photographing this - the topstitching must like the camera, because it aint popping in real life!)

I made this dress for Isabella. The embroidered denim is so soft and I love the muted shade, but it refused to tell me what it wanted to be till I came up with this design. It WANTED to be this dress, but I think it was wrong. The seamlines which took me a very long time to sew did not pop as they were supposed to, and the topstitching didn't help. The big design feature of this dress is the zig zag seaming and it sort of gets lost in the embroidery, which is louder than the topstitching. So after thinking (stewing) about it for a while I came up with a solution. (No way was I unpicking all that topstitching and redoing it with two strands of thread or topstitching thread like I should have done in the beginning!) I went over it again. Or rather, I'm going over it again. It takes a very, very, very long time because it Must Be Right, which means that I have to wheel the sewing machine by hand to ensure that the needle exactly hits the existing holes. And you know what? Take a look at this photo.

You can hardly see the difference! Mostly that's the photo again - in real life the difference is more apparent, although subtle. (In the above picture I've gone over the upper stitching and the lower panel in the middle right.) However, when I glance at the dress sitting on my desk the doubled stitching does noticably pop out a little more. The effect will be more pronounced with all the stitching done. If this was to be sold I doubt I'd have gone over it, but it would annoy me every time Isabella wore it, so it Had To Be Done. It will take a couple of hours and nobody but me would have noticed. I bet everyone reading this is rolling their eyes and yelling that I should get over it. (I know, I should.)
On the plus side, I'm really pleased with the colour combination of the denim and facing - it's a lovely soft yellowy green. Is this colour called celadon? Anyway, I love the two together, and I totally love the tree. Stenciled in black from the Duplo robot tree I photocopied. Done in black as directly inspired by the beauty on Foxs Lane here (although I also absolutely love this one too) Hers are screenprinted directly onto vintage sheets, and the crisp sharp black looks stunning against their slightly faded softness. Mine was stenciled onto a scrap of the facing fabric then sewn on and trimmed.

So, when I am finished the other 7 skirt panels and resewing the hem (which I did undo so that I could do my restitching past the hem fold or else it'd look funny) Isabella will have a new dress. (Poor girl will spend her life dressed in prototypes!) It'll look so cute with the red rose patterned tights she's inherited from Georgia.....

Thursday, May 20, 2010

My Creative Space - covered button tutorial

I'm playing along with Kootoyoo's Creative Spaces again this week.

Today I bring you covered buttons, but not the kind you buy in kit form and cover. I was wandering through town a few days ago and saw something like this on a jacket in a shop window and my brain just about exploded with approximately four trillion possible variations.

This is what my first two (very quick) versions looked like.

To make them you need either buttons, flat with holes or with a shank, (mismatched or ugly buttons would be great) or something to use as a button form. A layer or two or three of firm plastic cut into any shape and size you fancy for a button will work perfectly. I reckon old ice cream containers would be ideal. (Not that I have dozens of them lying around or anything you understand). Just cut your desired shape and poke holes so it can be sewn onto something. Also some fabric, preferably one which won't fray. (If you use a fabric which will fray you can always dab fray check on the edges.) I can see this idea working brilliantly on some of the stunning felted wool jumper refashions I've seen around the place. And thread - embroidery floss or regular sewing thread, whatever you like!


First place a button between two layers of fabric. (Note to self - desk surface looks horrible. You really should sand and refinish it to get rid of that nasty rough surface)


A few pins around the perimeter to keep it in place. (Is that how you spell perimeter? It looks a bit odd to me.)


Then with floss or thread and a simple running stitch, stitch around the edge of the button. My fabric was pretty thick and fuzzy, so I used 6 strands of floss.
Then trim away the excess fabric beyond the stitching.


To attach to your garment, you need to find the button's holes and stitch through them. After sewing it on with regular thread, go over it with embroidery floss to match the running stitch.
Easy!

To use a shanked button, poke a hole just big enough to squeeze the shank through in a scrap of fabric, then proceed as before sandwiching the button between two layers of fabric.


To make it more interesting I did the most basic lazy daisy embroidery on the scrap to be the face of the button. The sky's the limit for embellishment here! This time I sewed the two fabric layers together with matching sewing thread before trimming away the excess.


Then went around the edge with a simple blanket stitch for a different look.


So there you are - a very simple idea which lends itself to infinite possibilites for unique and perfect buttons for deserving projects. It would be great for brooches too, just sew or glue a brooch back to the finished button. I can see one or two (or three...) as the finishing touches on a bag, one single giant button pinned over a simple fastening on a cardy - I'd better stop before my brain really does explode. Oh how I love possibilities!
If anyone makes these, please let me know - I'd love to see what a creative mind can do with this!
Oh yeah, and I obviously didn't invent this idea, but I haven't seen it anywhere else, so I'm hoping that I don't have a bunch of readers rolling their eyes saying "That tired old idea again!" and yawning. Hopefully someone else will find this as intriguing (now there's another word I'm never sure how to spell) as I did.

Wednesday, May 19, 2010

Dreaming of summer.....


This is the first time I've made something with a hypothetical potentially international market in mind. I haven't managed to talk myself out of a shop on Etsy yet, so I thought I should make some things which are geared to a northern hemisphere summer. Light blue cotton drill, teal piping, and teal and green stencilling with a seaside theme - laying on "summer" with a trowel!
Which on this grey dreary uninspiring autumn day makes me long for the long hot days of summer. (Yes Dunedin does so get those!)

Friday, May 14, 2010

What a difference a skirt makes!

I've been thinking about my image lately. Like most women I'm not happy with how I look. Mostly I'm happy with what's under my clothes, (I eat well-ish, I work out regularly) but I dress like a frumpy housewife. I fall into the trap of not bothering to dress up because so many days I spend all my time dealing with children and not even leaving the house. If nobody but my family is going to see me, why bother?

I have lots of lovely clothes in my wardrobe, made when I worked in my BIL's hair salon. I have very large boxes filled with fabric I love, and enough pattterns to last forever. Not to mention the know-how to create my own, should I so wish. So I have no excuse to dress like a frump.

A few days ago David found some photos of a holiday we went on 10 years ago to Fiordland (the only time we have ever been away with no kids - Cayden spent a few days in Wanaka with his grandparents and it was a year before we had the next one). So there I was, 30 years old and having had only one child, and the thought that I couldn't get out of my head was that I look better now than I did then! But quite frankly, who could tell?

And that got me thinking that it is high time I stopped dressing like a frump and started working those lovely clothes into my wardrobe. Today I had some errands to run in town, and I decided to get out something nice to wear, as opposed to the something tidy I usually reach for. And when I started the archaeological dig required to peruse the long unworn contents of my wardrobe what do you think I found? This skirt. I made it before I had the twins and loved it, and had never worn it because I couldn't think what to wear with it! Time to change that! A good dig through my drawers'o'tops produced this one (well, actually first it produced a dull gold one identical to this one, till I remembered this one and thought it'd work better). I wore a little black cardy over it, but David said to take it off for the photos he took when he came home for lunch. He said lots of other stuff too, but that's private ;-)

And all day I've felt like this.


Here's a boring frontal shot to show how it sits when I'm not swishing.

When I looked in the mirror this morning I thought "nice legs!" and I hate my legs and their cankles, so that tells you something!
For the record, the skirt is Butterick 4859. And the top is a Burda one which I can't currently find on their site because a server somewhere appears to be down. Next time I make it I'm going to bring in the shoulder. I don't think that hanging off the shoulder point does me any favours - my shoulders and arms are my best bits and would be shown to better advantage with an armhole that shows the top of my arm.
So there you go, I've decided that I want to feel like this all the time. I need to work out how to incorporate the lovely items from the depths of my wardrobe into outfits I can feasibly wear to play with the twins and walk down to school. I'll keep you posted.

Wednesday, May 12, 2010

One more done

Are we sick of bubble dresses yet? I'm really liking the softer wintery colours of my newest creations, and the pop of the stenciled designs that makes them distinctively mine. How about some plaid on the bias - why didn't I think of bias before?!


And a rose because it's pretty.


I've been mulling over the online shop idea and peeking around etsy and pay-pal. It's going to take a clear head and a few cups of coffee I can tell you, but I'm pretty well decided that there will be an online shop in my not-too-distant future. I will build up some stock though, and I also need to have a good think about what I should make - a small number of styles in different fabrics/colours? Or would a larger range of styles in smaller numbers have the widest appeal (more obviously unique)? So anyway, it won't be immediately.

Oh, and Kathryn, the tree dress is one of my own designs. (The tree is a duplo piece, from their robot line a couple of years ago. I photocopied it and added a bit more trunk.)

Tuesday, May 11, 2010

Finished stuff

I finally got the paint colour I wanted and finished this dress. I love the sound of "burnt umber". It sounds so autumnal and perfect for a tree I think. Usually paint colours' names are, um, creative, but this one just sounds right.
Anyway, this is what burnt umber looks like painted onto dusky pink satin, sewn onto a sage green dress.
Now, do I keep it or sell it? I still haven't tried it on Isabella, largely because she has a cold and I keep envisioning a huge messy sneeze just as I pull it over her head, and then deciding that it isn't her colour and I shouldn't keep it.

The other finished garment is this dress. Another one I really like - oh how I love seaming concave and convex curves together - especially with piping in the seams.

The printed panel on this one was done with a craft punch and freezer paper, but I have visions of this dress done in any number of ways - contrasting fabric for one panel, closely toning different fabrics for each panel, different seam treatments, heavy winter fabrics, lightweight summer fabrics.......

Thursday, May 6, 2010

My Creative Space - bits and pieces

I'm playing along with Kootoyoo's creative spaces again this week.

My creative space is dominated by stuff half done. And instead of finishing said half-done stuff, I shoved it all to the side in favour of a bit of pintucking (on the bias of course, I'm nuts like that) this way...

....followed by a bit of pintucking that way.....


While blog-surfing yesterday I saw someone do a cute baby tunic using fabric pintucked this way. And do you think I can find it today? Not likely! So naturally I had to do this today so that I wouldn't forget it! (I love my blind hem foot for this by the way - brilliant invention)

This piece may well get used as the yoke for another dress like this.

This one is actually intended for Isabella, but I reserve the right to change my mind once I try it on her. (The colour may be a bit heavy for her. With her big blue eyes she looks beautiful in blue.) I love the design of this one - so many elements I love to do. Inset corners, pleats, concave curves sewn to convex curves. I deliberately drafted this in her size, so if it doesn't suit her it'll go for sale and I'll make her another one. It just needs it's embellishment. I know what I want to do but don't have paint the right colour, so it'll hang by my desk making me happy for a few more days.
Here's a better detail shot of the bodice details I love.


Also hanging by my desk making me happy is this dress.

I'm a bit in love with this one too. The black and white houndstooth check, the deep red stenciled roses, the tulip sleeves edged with piping in the same red. This one is definitely for sale though.


Which brings me to another subject - selling my stuff. I've been musing for a while over getting a shop on Felt to try selling my designs, and I think maybe now's the time. I went into Miracle yesterday for my regular supply of nappy liners and they told me that due to space constraints (they're full of gorgeous new stock just now) there isn't room at the moment for my things. Since I have no other outlet, I'm quite happy for them to hang onto them and pop them out again when they have space (which is what they offered to do).
The fees on Felt are very affordable, so it wouldn't cost much to get some things listed there. It just seems like such a big step to get an online shop! I'd really welcome any thoughts from anyone on the subject. I want to keep selling through Miracle because I get great feedback from them, but is it time now to try and get a bit more of my stuff out into the world?

Monday, May 3, 2010

Tutorial: Wrap front onesie, part 2 - sewing

Right, time to sew this together. I have an overlocker (serger) so I sew most of it with that, but an ordinary sewing machine zig zag stitch will work just fine.


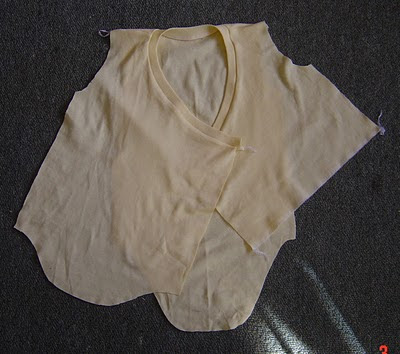
Firstly, sew the shoulder seams. This is where you'll notice if you didn't mirror your front. Go on, ask what made me stress that point during my last post ;-)

Then the neckband gets sewn on. Fold it in half along it's length, and give it a gentle press (it makes it so much easier to manage). Pin the centre of the neckband to the centre back of the neckline, matching raw edges.


Now it gets a bit more interesting. You have to pin the rest of the neckband to the neckline, but obviously, the neckband is shorter (to accommodate the shorter distance required at the outer edge of the neckline), so it needs to be stretched to fit the neckline. That's easy enough, but I don't distribute the fullness of the neckline evenly - you don't want much along the front edges, and you want to squish a lot into the tight neck curve. I sort of estimate what looks about right and put in a pin close to the top of the front, like this:

Then the fullness is distributed evenly within each of those 2 zones and the neckband is sewn on. After sewing and pressing, it looks like this:

I often finish the lower edge of the front underlayer just by overlocking it. It isn't going to fray so could be left raw, but the overlocking helps to prevent the fabric rolling.


Next up are the side seams. Make sure you get the layers around the right way. Go ahead and ask me how I know to check that too! All three layers are sewn together.

My preference is to always set in my sleeves rather than sew them in flat, but in the interests of making my life somewhat easy I hem them before I sew the sleeve seam and set them in. If you want to sew your sleeves in flat and then finish the side seams, that will work just fine.

To flatten the sleeve seam I sew a few stitches holding it open.


Now to set in the sleeve. I personally don't find this any harder than sewing them in flat, and I think they sit much better sewn this way but that's just my preference, and I have done a lot of them so I've had a lot of practice!


See how nicely they sit? I think it gives a better, rounder shape to the underarm.


Which just leaves binding the leg opening. Join the two short ends of the binding, quarter the binding and opening and pin together at those points, with onesie and binding right sides together.

Stretch the binding to fit the curves, stretching more on concave curves, and less on convex, pin it on and sew in place. (I do this with a straight stitch on my sewing machine.)
Then wrap the binding over the seam allowances to the back, and pin in place.
I use a simple zig zag on my sewing machine to sew from the right side to anchor the binding. Since the zig zag has stretch, and is holding all the layers, the straight stitch you did earlier can pop if it wants to without in any way compromising the garment (but I've never noticed that it does). Then just carefully trim away any excess binding on the inside.
Two domes (snaps) and you're done! I'm cheating and showing the same photo as my last one because I had it already, and the new onesie is identical.

There, I said it was easy! If anyone has any questions, please sing out. I've done so many of these I forget sometimes that not eveybody else has too.