Wednesday, July 21, 2010

Stuff I've been making

I've been busy making up some of my designs while I get up the nerve to open an Etsy shop. What if I do and no one even LOOKS at my stuff?! Self Confidence and Putting Myself Forward have never been my strong suits. Anyway, I really need to suck it up and just DO it!


In the meantime, I've made this:


And this:


And this, the dress from my last post:


And some nice bright stripes and printed batik, with pockets incorporated into the princess seams and stencilled jacks, just for fun. Like it wasn't a fun dress already.


And I added the shark to this shirt which has been returned from Miracle having sat there unsold for quite a while.


I used today's bright sunshine to get most of these photos taken, and since I did I was able to put off the last detail needed on this coat. Keyhole buttonholes. Making them on scraps of denim is one thing. Making them on a garment which I hope one day to sell is something else. Somebody (sorry I didn't respond then, I tend to get a little distracted) asked about using a buttonholer on zig zag machines. It's even better - it'll work on straight stitch machines! I guess these type of attachments were developed in the days when machines pretty much only did a straight stitch.


Right, the 16 year old has a half day and needs the computer so I'm out of excuses. Back to the machine......

Thursday, July 15, 2010

My creative space - an external all-in-one facing tutorial.

I'm visiting Kootoyoo's Creative Spaces again this week - so much fun to peek into everyone else's!

My creative space is full of stuff in various stages of completion, so I thought I'd take the opportunity to demonstrate my way of doing an all in one facing, expertly demonstrated by Sherry recently. Her method works for pretty much all applications, mine only when there is a centre front or back opening in your garment, and wide enough shoulder straps. I find it easier, so I thought I'd show it here in case anyone else might benefit!

As mentioned, the garment must have an opening in CF or CB. Begin by sewing the shoulder seams of garment and facing and press them open. Since my facing is going to be on the outside I've sewn the dress with wrong sides together and facing with right sides together. This means the seams will all be enclosed when the dress is finished.

(Apologies in advance for the rather over-exposed photos in this post - my desk is bathed in sunshine during the twins' nap time!)

Then sew the facing to the garment around the neckline and armholes. If you're inserting a zip, leave about 3cm unsewn at the CB edge. I'm not so I sewed it right to the edge. Most importantly, leave about 3cm unsewn at the armhole edges.


Clip the curves so they'll turn evenly. I always offset my clips so that where the "Vs" form by opening out a curve they aren't in the same place on garment and facing seam allwances. This makes for a smoother edge.


Then turn the garment right side out by pulling the backs through the shoulders.


At this point I pin and edgestitch my neckline because it's easier when it's flat and the way my CB opening is finished won't be affected by it being done now.


Next sew the side seams of garment and facing, and press them open.


Then finish sewing the facing to the garment around the bit of armhole left unsewn, and finish clipping the curves.


After edgestitching the armholes, it looks like this.


Last of all the seam allowance on the lower edge of the facing is pinned and stitched down. After one final press, here it is.


I really like these external facings on dresses I make for children since they give a lovely smooth finish inside, and a nice lift to a plain design.

Sunday, July 11, 2010

Why My Blogging Is Somewhat Erratic At Times

This is Nicholas's favourite position from which to watch Timmy Time while I try to drink my first cup of coffee for the day and catch up on blog reading. Usually he has a handful of my hair too. (Yes I know I should have brushed it. It's Saturday and I wasn't going anywhere so I was slack!)

Thursday, July 8, 2010

My Creative Space - Um, Bandwagon, room for one more?

I thought I'd join in with Kootooyoo's Creative Spaces this week because I just couldn't resist jumping on the man's shirt to toddler dress refashion bandwagon. (One of my personal favourites on this theme was the hilarious "How to turn a toddler's dress into a man's shirt" posted on April 1st. annoyingly I can't now find it, and Google isn't helping)

So here's my version, for which I won't provide a tutorial because there are about 70,000 results from Google if you look. Besides which I don't do the "lay a dress which fits your toddler on top of the dress and cut around it" style of sewing. I'm a pattern maker. Not a proper one (a patternmaker, with no space between the words), but I learnt the principles as part of my degree and continue to learn all I can from books and the internet (check out Sherry's blog for some brilliant tutorials). I drafted a pattern for an A line dress in a size three (so it should fit Isabella better this summer, when she'll be over 2 and a half) and made this.

I'd started with this. David doesn't wear short sleeved shirts, so when his brother was having a clean out I swiped it.


To maximize available fabric I unpicked the (flat-felled) side seams.

And squeezed my pattern pieces on. I had to unpick a bit of the armhole seam as well to get it to fit.


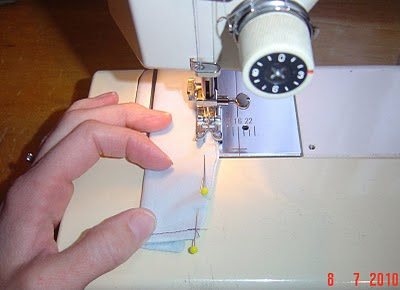
Here's a reminder of how I manage my turn of cloth allowance for collars. Sherry shows how to do it properly at the pattern stage. I've folded the collar and pinned the lower edge and now I'm sewing within the seam allowance to secure it before attaching it to the neckline. You can just see how the underneath layer is peeking out.


Also on my desk today are these trees, freezer paper stencilled. I really really really love silhouettes of bare trees.

And my friends have been giving me stick for not mentioning my dress. I wore it out to dinner for one friend's birthday last weekend. Where it was much admired and I felt a million bucks. (I even ran into my BIL who told me I looked fantastic.) I realised that it wasn't the dress that left me feeling Meh, it was the grey and dismal winter we've been having! So Keely, J, M, H and other J, there you go. I mentioned it.