Showing posts with label tutorials. Show all posts

Thursday, July 15, 2010

My creative space - an external all-in-one facing tutorial.

I'm visiting Kootoyoo's Creative Spaces again this week - so much fun to peek into everyone else's!

My creative space is full of stuff in various stages of completion, so I thought I'd take the opportunity to demonstrate my way of doing an all in one facing, expertly demonstrated by Sherry recently. Her method works for pretty much all applications, mine only when there is a centre front or back opening in your garment, and wide enough shoulder straps. I find it easier, so I thought I'd show it here in case anyone else might benefit!

As mentioned, the garment must have an opening in CF or CB. Begin by sewing the shoulder seams of garment and facing and press them open. Since my facing is going to be on the outside I've sewn the dress with wrong sides together and facing with right sides together. This means the seams will all be enclosed when the dress is finished.

(Apologies in advance for the rather over-exposed photos in this post - my desk is bathed in sunshine during the twins' nap time!)

Then sew the facing to the garment around the neckline and armholes. If you're inserting a zip, leave about 3cm unsewn at the CB edge. I'm not so I sewed it right to the edge. Most importantly, leave about 3cm unsewn at the armhole edges.


Clip the curves so they'll turn evenly. I always offset my clips so that where the "Vs" form by opening out a curve they aren't in the same place on garment and facing seam allwances. This makes for a smoother edge.


Then turn the garment right side out by pulling the backs through the shoulders.


At this point I pin and edgestitch my neckline because it's easier when it's flat and the way my CB opening is finished won't be affected by it being done now.


Next sew the side seams of garment and facing, and press them open.


Then finish sewing the facing to the garment around the bit of armhole left unsewn, and finish clipping the curves.


After edgestitching the armholes, it looks like this.


Last of all the seam allowance on the lower edge of the facing is pinned and stitched down. After one final press, here it is.


I really like these external facings on dresses I make for children since they give a lovely smooth finish inside, and a nice lift to a plain design.

Thursday, May 20, 2010

My Creative Space - covered button tutorial

I'm playing along with Kootoyoo's Creative Spaces again this week.

Today I bring you covered buttons, but not the kind you buy in kit form and cover. I was wandering through town a few days ago and saw something like this on a jacket in a shop window and my brain just about exploded with approximately four trillion possible variations.

This is what my first two (very quick) versions looked like.

To make them you need either buttons, flat with holes or with a shank, (mismatched or ugly buttons would be great) or something to use as a button form. A layer or two or three of firm plastic cut into any shape and size you fancy for a button will work perfectly. I reckon old ice cream containers would be ideal. (Not that I have dozens of them lying around or anything you understand). Just cut your desired shape and poke holes so it can be sewn onto something. Also some fabric, preferably one which won't fray. (If you use a fabric which will fray you can always dab fray check on the edges.) I can see this idea working brilliantly on some of the stunning felted wool jumper refashions I've seen around the place. And thread - embroidery floss or regular sewing thread, whatever you like!


First place a button between two layers of fabric. (Note to self - desk surface looks horrible. You really should sand and refinish it to get rid of that nasty rough surface)


A few pins around the perimeter to keep it in place. (Is that how you spell perimeter? It looks a bit odd to me.)


Then with floss or thread and a simple running stitch, stitch around the edge of the button. My fabric was pretty thick and fuzzy, so I used 6 strands of floss.
Then trim away the excess fabric beyond the stitching.


To attach to your garment, you need to find the button's holes and stitch through them. After sewing it on with regular thread, go over it with embroidery floss to match the running stitch.
Easy!

To use a shanked button, poke a hole just big enough to squeeze the shank through in a scrap of fabric, then proceed as before sandwiching the button between two layers of fabric.


To make it more interesting I did the most basic lazy daisy embroidery on the scrap to be the face of the button. The sky's the limit for embellishment here! This time I sewed the two fabric layers together with matching sewing thread before trimming away the excess.


Then went around the edge with a simple blanket stitch for a different look.


So there you are - a very simple idea which lends itself to infinite possibilites for unique and perfect buttons for deserving projects. It would be great for brooches too, just sew or glue a brooch back to the finished button. I can see one or two (or three...) as the finishing touches on a bag, one single giant button pinned over a simple fastening on a cardy - I'd better stop before my brain really does explode. Oh how I love possibilities!
If anyone makes these, please let me know - I'd love to see what a creative mind can do with this!
Oh yeah, and I obviously didn't invent this idea, but I haven't seen it anywhere else, so I'm hoping that I don't have a bunch of readers rolling their eyes saying "That tired old idea again!" and yawning. Hopefully someone else will find this as intriguing (now there's another word I'm never sure how to spell) as I did.

Monday, May 3, 2010

Tutorial: Wrap front onesie, part 2 - sewing

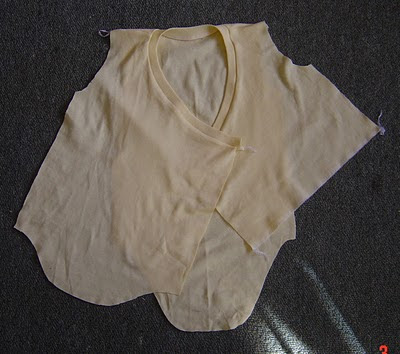
Right, time to sew this together. I have an overlocker (serger) so I sew most of it with that, but an ordinary sewing machine zig zag stitch will work just fine.


Firstly, sew the shoulder seams. This is where you'll notice if you didn't mirror your front. Go on, ask what made me stress that point during my last post ;-)

Then the neckband gets sewn on. Fold it in half along it's length, and give it a gentle press (it makes it so much easier to manage). Pin the centre of the neckband to the centre back of the neckline, matching raw edges.


Now it gets a bit more interesting. You have to pin the rest of the neckband to the neckline, but obviously, the neckband is shorter (to accommodate the shorter distance required at the outer edge of the neckline), so it needs to be stretched to fit the neckline. That's easy enough, but I don't distribute the fullness of the neckline evenly - you don't want much along the front edges, and you want to squish a lot into the tight neck curve. I sort of estimate what looks about right and put in a pin close to the top of the front, like this:

Then the fullness is distributed evenly within each of those 2 zones and the neckband is sewn on. After sewing and pressing, it looks like this:

I often finish the lower edge of the front underlayer just by overlocking it. It isn't going to fray so could be left raw, but the overlocking helps to prevent the fabric rolling.


Next up are the side seams. Make sure you get the layers around the right way. Go ahead and ask me how I know to check that too! All three layers are sewn together.

My preference is to always set in my sleeves rather than sew them in flat, but in the interests of making my life somewhat easy I hem them before I sew the sleeve seam and set them in. If you want to sew your sleeves in flat and then finish the side seams, that will work just fine.

To flatten the sleeve seam I sew a few stitches holding it open.


Now to set in the sleeve. I personally don't find this any harder than sewing them in flat, and I think they sit much better sewn this way but that's just my preference, and I have done a lot of them so I've had a lot of practice!


See how nicely they sit? I think it gives a better, rounder shape to the underarm.


Which just leaves binding the leg opening. Join the two short ends of the binding, quarter the binding and opening and pin together at those points, with onesie and binding right sides together.

Stretch the binding to fit the curves, stretching more on concave curves, and less on convex, pin it on and sew in place. (I do this with a straight stitch on my sewing machine.)
Then wrap the binding over the seam allowances to the back, and pin in place.
I use a simple zig zag on my sewing machine to sew from the right side to anchor the binding. Since the zig zag has stretch, and is holding all the layers, the straight stitch you did earlier can pop if it wants to without in any way compromising the garment (but I've never noticed that it does). Then just carefully trim away any excess binding on the inside.
Two domes (snaps) and you're done! I'm cheating and showing the same photo as my last one because I had it already, and the new onesie is identical.

There, I said it was easy! If anyone has any questions, please sing out. I've done so many of these I forget sometimes that not eveybody else has too.

Wednesday, April 28, 2010

Tutorial: Wrap front onesie alteration. Part I: Pattern

First up, you need a pattern. I used one from Ottobre, issue 01/06, #4, but there are plenty of others around. My preference is for set in sleeves (I'll explain why when I get to that bit) the neckline and shoulder style are irrelevant because you're going to change them anyway. I looked up a few options. There's KS 2433 or KS 3375 for a looser fit. Or there's Butterick 5896 or McCalls 6103 or Simplicity 2459 or 2905 (which looks to me to be the same bodysuit pattern).


To start with you need a whole front, so trace one, flip the paper and trace another one. I then copy over that line from the right side so I have a whole front traced on one side of the paper. I particularly like working with Ottobre patterns because (apart from the great fit) they don't have seam allowances added. (It is a whole lot easier to work on patterns with no seam allowances and add them when you're done.) If you have a pattern with seam allowances already on it, it's worth marking in the stitching lines to make it easier to work with.

You need to trace the shoulder (stitching) line. If you have an envelope neck design this may be marked on. If not, there will be a registration mark to line up the overlap. Use this to work out where the shoulder line is.

I've used KS2433 to illustrate this. I traced the front and back pieces, overlapping them where indicated by the notch. I then folded my paper so that the side seams lined up and creased where that put the shoulder line. I've drawn in a dotted line to mark it. (I haven't subtracted the seam allowances for this, since it's just to illustrate how to find the shoulder line)

As you can see the resulting neckline needs a bit of tweaking, but at this stage that is very easy to do to produce a smooth neckline.


Then you draw the style lines onto the whole front. The neckline in the original pattern I'm using was to be bound, so the neckline here is the finished neck edge. I drew a line from the neck edge to the armhole seam. This line is the new finished neck edge. Now draw another line 1.5cm in from this line. This is the new stitching line for the neckband. The reason I choose set in sleeves becomes apparent here. If you choose a raglan style, the finished neckline will be shorter, which gives you less room to fit over the child's head. It is unlikely to be so much shorter that it causes a problem, but I figure why risk it?

The two parallel lines across the tummy are the cutting line and fold line for the under layer.

Now to work out the length of the neckband, overlap the back and front at the shoulder stitching line (I've traced my pattern to show this, since I didn't take any photos of the process I showed bits of in an earlier post). The solid line at the shoulder is the stitching line, and the dotted lines represent the overlapping seam allowances.


Then using a tape measure on it's side measure the finished neckline from centre back to the armhole. The measurement you get is half the length of the finished neckband (since you're measuring half the pattern). Easy!

Now the bit you need to be careful with. I decided on a finished neckband width of 1.5cm, so I drew a line on my pattern pieces 1.5cm from the finished neck edge. If you click on the picture below you'll get a bigger image and should be able so make out that this line is marked "1". This is the stitching line for the neckband. Then draw a seam allowance onto that - this line will be between the neckband stitching line and the finished neckline. My seam allowance is 1cm. That line is marked "2" and the finished neckline is marked "3".


Cut out your pattern pieces along the new cutting lines. (You'll be working with two separate pieces of paper for front and back of course, not a single piece of paper as I'm showing here since this illustration was just a tracing to show the process.) This gives you new front and back pieces.

To make a pattern piece for the front under layer, trace a mirror image of the front, down to the lines drawn on earlier.


Make a neckband pattern piece twice your finished width, plus seam allowances, and half as long as the finished neckband so you can cut it on a fold. My finished neckband is 1.5cm wide, so my pattern piece is (1.5cm + 1cm) x 2 = 6cm wide (finished width + seam allowance) x 2 (since it's folded in half.)

The sleeves are unaltered from the original pattern.

There you go, pattern done! Next up I'll show you how to sew it together. I promise it's easy too.