Thursday, May 28, 2009

The Coat. Finished.

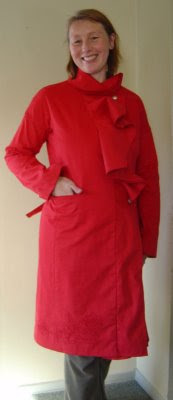
Woohoo! At long last, here it is. Unfortunately this is the best shot I have of it on me. My husband quickly snapped it when he came home for lunch and I didn't check it till he'd left, then found it a bit out of focus. Maybe he just shot me soft-focus to be kind? (Bad hair day and squinty eyes. Not my best look!)

Here is an only-slightly-better photo of it on my dummy. The buttons are actually ones I rescued from a jacket I bought in 1987 and loved to death. When it wore out I kept the buttons, which I'd forgotten about till I came across them by chance looking for something else after failing to find any I liked for this coat in town!

I nearly went spare over the buttonholes on this. I had to pick out one of them FOUR TIMES because it was too close to the body of the coat and the buttonhole foot sat over it. I tried shimming the other end of the foot, and after four attempts and much swearing, decided to move the buttonhole so that I wasn't so near the body of the coat. This ended up being about 5mm. yep, I spent an hour of frustration swearing over 5mm! Since the buttons are unevenly distributed anyway, it's not even slightly noticable. I had to move the button to match, but that was no drama.

I like the way I can button the collar right up around my neck. I love my almost-ankle length wool-cashmere coat which is very warm, but not around my neck. I hate having a cold neck. A scarf is easily added, but a coat which buttons up high is just cosy. Having said that, this coat is not for the coldest winter days. Mary Nanna, coming from Dunedin you'll remember just how cold it can get with the southerlies whipping in straight from Antarctica. This is my Sunny-Winter-Day coat. The wool-cashmere is for the really cold days!

I'm very pleased with how it turned out, but I do wish I'd thought about pocket placement before I made them. They'd be so much better lower down. So far I haven't added any extra buttons (I do have some). I think I'll wear this at least once and see if it flaps open too badly before I decide.

Conclusion: I have proven to myself that, AMEW notwithstanding, I am capable of not only making, but also altering, an Issey Miyake pattern. Despite not having had a proper night's sleep in over a year. Life is good. :-)

While I was on a roll (and waiting for new camera batteries because the old ones died right after I took the dummy shot of the coat yesterday) I made this new Ottobre nursing top. I'm considerably bustier than my dummy at the moment, so I fill it out better!



Monday, May 25, 2009

The "Awesome As" sweatshirt

I hope she's always this easy to please! I wasn't sure what Georgia would think of this fabric with skulls all over it, so I was prepared to use it for her brother. Fortunately she is still pretty suggestible, so when I said I thought it'd be a cool sweatshirt she pretty readily agreed. It's very hard to tell from this photo, but the zip has green teeth on one side and red on the other. I bought a big bag of zips from the Tamahine (manufacturer) closing down (sob!) sale last year, and Georgia and I had fun switching some around.

The pattern is from Topkids 45, #22 with cuffs and waistband added to give it a bit more growing room. Georgia is pretty slender, so this skimmed in shape really suits her. The pattern is darted, and called a shirt, but I measured it and decided it'd do fine as a sweatshirt for her. I'm tempted to make it as a T shirt for her though by making a smaller size with the darts, and just adding length to sleeves and possibly the body.

Her verdict? Awesome As!

Here's Isabella in the tunic I made her last week. It's Ottobre 06/08, #6 in size 74. It fits her perfectly, and I really love it. I didn't have quite enough fabric to cut the sleeves long enough for the elastic casing (believe me, I tried!) so I cut them with no seam allowance, gathered the ends and bound them. Same look, little more effort.

Mean picture, but the best way to get a photo of her standing up facing the camera!

Sunday, May 24, 2009

A year ago today

They looked like this. Born very unexpectedly 7 weeks prematurely. I'd had a dream pregnancy till a week earlier when I started showing signs of pre-eclampsia. I'd seen my midwife the day before they arrived and was due to go into hospital for (hopefully only a day) monitoring. 3.45am my water broke. I won't bore you with the birth story, but it was a good one - avoided a c-section! This is how they looked for the first few weeks.

Nicholas (with CPAP helping him breathe.)

Isabella was ventilated for the first day before she went onto CPAP too.

It's hard to tell scale from these photos - they just look like little babies. Isabella weighed 5lb3oz, and Nicholas weighed 3lb9oz. With all the wires and tubes they looked so fragile! I can't say enough good things about the NICU staff at Dunedin Hospital. They were wonderful for the whole 33 days we were in there, but I couldn't wait to get the twins home! It's been a very busy year, to put it mildly, and we've had our ups (they both used to sleep so well at night, sigh) and our downs (it took Nicholas three months to learn to breastfeed. That wasn't fun), but I wouldn't trade it for the world. They are fabulous little people, and I feel very lucky to have them completing our family.

Here they are with Georgia and Oliver this morning. The bigger kids were way more excited about the present than the twins were!
Happy birthday Isabella and Nicholas. It's been quite a year :-)
Oh, and to inject a sewing note into this post, I made Isabella's pants (the disco ones) tunic and sweatshirt, Nicholas' pants and top, and Georgia's sweatshirt. I'll post that one shortly.

Thursday, May 21, 2009

Reversible baby jacket.

Here is the best of four attempts to photograph Isabella in her new jacket. It's Ottobre 06/08, #4, in a size 74. The only alterations I made to this one were to make it reversible, and use domes instead of the very cute ribbon tie from the pattern.


Here's the teal/green side:


And here's the brown side:
This way it's warmer, goes with more outfits, and if she spills on one side, I can turn it inside out if she needs to look tidy!
Seeing it flat the fact that the hearts aren't straight looks odd. That's the way the fabric was printed, and I wondered if I should cut off grain to have them straight. I chose not too, because off grain by that much would not look good.
The domes are silver, and I used a scrap of each reverse side fabric to reinforce them and play them up a bit.
This was a great, quick easy project. The flower applique is simple, and making it reversible is not hard either. However, I am thinking of renaming my blog AMEW, because not a single project at the moment avoids the syndrome! This time I twisted one of the sleeves as I was sewing it in, and didn't notice till I'd finished topstitching the edge. A few choice words later, I unpicked the offending sleeve edge, untwisted it, ladder stitched it back together, and re-topstitched it. (For anyone new to this syndrome, AMEW is where I shouldn't be allowed to tackle anything requiring Any Mental Effort Whatsoever, due to lack of sleep causing my brain to refuse to function!) Oh well, it's always entertaining seeing how many new ways I can screw up a basic project! As long as it's not while cutting, everything is fixable.


Tuesday, May 19, 2009

Coat almost done

Almost there! All I have left to do now are the buttons and buttonholes. I'm going to town on Thursday, so should be able to get some then, but I couldn't wait to post this. It doesn't actually look much different from my last post, but since then I've made and inserted the lining, done the hems, and lastly sewed the lining to the hems.

I never used to like hand sewing - why sew by hand when I have a perfectly good machine? Over the years I came firstly to see the benefits, and then to really enjoy sewing by hand. I really like the look of a hem hand catch stitched to underlining - not a visible stitch from the outside. Then lining invisibly fell stitched to the hem. Perfect! It takes a while, but is very relaxing to do. This is why I called my blog Everything Just Sew. I really love a project which takes time and care. I really do like doing everything just so. Well, maybe not EVERYTHING, but a lot of things :-)

This is what it looks like inside out. The pic is fuzzy as usual, annoyingly. It's skull and crossbones. Classy lining, no? I like clothing that doesn't take itself too seriously. My eight year old son is getting boxers from the leftovers. Or possibly Nicholas, depending how long it takes me to get around to them!


This shot shows it right side out with the front open. I'm still annoyed about the facing issue. I ended up using lining and stiff interfacing. Not stiff enough, but since the coat fabric is pretty stable and underlined with wincyette, it works well enough. When it's closed you can just see the edge of the lining at the neck edge, but it's not a big deal. In a year or two, when the coat wears out, I think I'll get over it.


In other sewing news, I have sweatshirting for two sorely needed sweatshirts for Georgia in the dryer right now, and I actually made a muslin for pants for me a few days ago. An honest-to-goodness, not-going-to-be-worn-even-if-it-works muslin. I'm still carrying a fair chunk of baby weight. (Which I wouldn't be if I hadn't got into the habit of having a snack every time I sat down to nurse. Twins nurse A LOT, but I digress.) So I figured I'd better try out the pattern in my current size before I potentially wasted time on it. To my utter delight, they fit perfectly! I've obviously retained my proportions well enough to fit the Burda sloper just fine. Now I need to retrieve the fabric (a rather lovely stretch corduroy donated from a friend's stash) from the roof, which requires a ladder and a sunny day, because I'm not dragging a wet ladder into my house! However, Georgia really needs her sweatshirts first, so I'll be Good Mum.

Thursday, May 14, 2009

The coat has a collar!

I've been sulking a bit over the lack of fabric for the facings for my coat, and ignoring it. Since it's been sitting on my dummy, which is stored in my bedroom, that's been a bit hard! So I finally got over myself and got on with it, and attached the collar. This was the point at which I was very, very glad that I'd tediously thread marked all the match points. The curves on collar and front edge are very different and vary along their lengths, so getting the collar on properly without all the match points would have had me swearing like a sailor! As it was, it took much careful pinning on the tightest bits of the curves, but was otherwise straightforward.

I pinned it closed where the buttonhole and button markings line up, just to get an idea of how it will look. I will have a long hard think about further buttons lower down. I think it'll need one or two to stop it flapping open, but I like the smooth line. So far, I am very pleased with it. I was a bit worried that the jacket design wouldn't lend itself to coat length, but think it looks just fine as a coat.

I haven't pressed it at all, because after I'd pinned it on I realised that I'd lengthened the collar pieces to the same length as the coat pieces, and when I hem the coat they'd be too long. It'll be very easy to fix, but I've left them at the moment till I decide exactly how long to hem the coat. AMEW again, but fairly mild this time! (The other AMEW moment was realising that I hadn't taken note of which side of the collar was which, and I had to drag out the pattern pieces and figure out which was left and which was right. If I'd spent ages pinning and got to a point at which I realised I'd got it the wrong way round, I'd, um, not have been pleased.)

And just for the heck of it, here's the back, showing the belt tie. I like this idea - shaping, but no fuss.

Oh, and my neice was sort of impressed with the library bag. Her mother (who WAS impressed and appreciative!) reckons she'll be really keen on it, especially when they go to the library. What H was REALLY impressed with was the $3 Murray Wiggle toy I picked up at Kmart before Christmas. She LOVES Murray Wiggle, and had been to a Wiggles concert a month ago. She cheerfully informed us that it was the best Murray Wiggle toy she ever had! Being a veteran of a few three year olds myself, this was exactly what I expected. (Murray was an even bigger hit than anticipated though).

Tuesday, May 12, 2009

Every baby needs disco jeans.

I had some nice shiny pink stretch woven left over from goodness-knows-what and figured it'd look cute as jeans for Isabella. I didn't have anything in a suitable pink for the waistband, so chose this rather bright lime green, which looks really funky with it. I love these jeans, but when I put them on her I thought that she looks ready for a disco! Every baby needs to be ready to party at any moment. Favourite altered Ottobre pattern again.


And here's the butt shot she'll hate me for when she's a teenager. It's a bit hard to see the green waistband thanks to the light, but hopefully you get the idea.


And just for a change of pace, I made this library bag for my niece. She's a big fan of Wibbly Pig, so I got one of the books out of the library for this very appropriate picture and appliqued it onto good sturdy canvas. I used fusible pellon as well, so the applique is slightly puffy. It's lined with sturdy tartan cotton, and I added a library card pocket to the lining as well. I just need to give the bag a final press before I give it to her.


I first thought of it to make for her second birthday. Well, she turned three in January. Oops. Fortunately her mother is my sister, who while overseas endeared herself to my eldest son (only child of the next generation in our family at the time) by sending very cool presents at random times of the year rather than specifically for his birthday. (She sent him Tinky Winky, who was his favourite Teletubby, before the toys hit our shores, and he nearly got mugged when he took it to pre-school!)

Tuesday, May 5, 2009

Blog face lift

I've been reading a lot of blogs lately, and realised that I find the white or pale-coloured backgrounds more soothing to look at, and they fight less with photos. So I decided to try this very plain style out and see how it looks. I definitely prefer it to the rather overpowering pink.

Monday, May 4, 2009

The Frankenjammies

Nicholas is the wriggliest baby on the planet. (I may have mentioned this before!) Getting him into his jammies at night is a mission. One piece rompers with feet are nice and warm, but getting him to sit still while I do up all the domes is near impossible. So the other night, after yet another mammoth wrestling match, I got fed up and decided to do something about it. For the seven millionth time I thought how glad I am that I can sew!

I wanted a one piece romper, with feet, and NO DOMES. I achieved that with a franken-morph of three patterns, one of which is my own adaptation of an Ottobre pattern to get the cross-over neck. The other two are Ottobre 04/08, #4, and KS 2344. I also used a zipped butt opening - easier than domes by FAR on Nicholas. I spent ages doing the pattern work yesterday afternoon to get a size 74, only to realise when done that it'd be too big, and had to do it again to get a 68. At least I'll have the 74 when he grows into it! The fabric is cotton velour left over from something I made myself a few years ago. Nice and soft and warm.


Today while they were napping I started sewing it up, and it didn't take a lot longer after they'd woken and had lunch. I'm delighted with it at this point, and can't wait to see how it goes when I put it on him tonight!
And here's the back. Very simple.


And this is the girly version of that grey fabric for Isabella. The zip and trim aren't quite the same colour, but look good together. The pattern is Ottobre 01/06, #2, with the same modifications as the last one. Her corduroy jeans are the same pattern as the last pair I made her. Thanks to C from next door for helping her stand!


Friday, May 1, 2009

More off the "To Do" pile.

These jeans had been sitting on the to do pile for an embarrassingly long time. All they needed was the dome, which I did yesterday. Oliver is pretty pleased with them, and so am I. This is the same pattern as these trousers, which I never liked much. I knew that in the right fabric they'd look great, and this good quality denim is the right fabric for sure! They look great. I've only posted this shot of the back because the light was so dim when I took photos before school this morning that it's hard to make out the details on the front. Assuming he hasn't trashed them at school today I'll get a pic in better light.


I also sewed up these corduroy jeans for Nicholas. I was curious to know just how long they take to sew, so I did them in one of the twins' nap times and timed the sewing accurately. It took almost exactly two hours from start to finish for all the sewing. (They were alrady cut out). Not bad considering the extra time needed for topstitching, not to mention swapping thread to do so! I have my construction order down pat to minimise the number of times I have to switch thread or swap between sewing machine and overlocker. I didn't really rush on these, so I could get the sewing time down a bit further. Maybe I should challenge myself to do that - just how fast can I turn out a pair of baby jeans?

And here's the back. I am so in love with these jeans.