Tuesday, June 29, 2010

And it's done.

Well, I finished my dress. Here it is. Front:

Back:

It fits well and looks just how I envisioned, but it leaves me feeling sort of "meh". The fact that I look so sour in these photos really doesn't help! I used the timer instead of getting David to take them because he isn't coming home for lunch today and by the time he gets home after work the light will be too gloomy. Perhaps it'd be a happier dress if I was wearing it out to dinner instead of quickly putting it on for a couple of photos before getting back into warmer clothes!

Saturday, June 19, 2010

Yeah I can crochet!

After my eight questions yesterday I wondered if I still had any of my early crochet efforts. I know that somewhere I should still have the round pineapple pattern doily?tablemat? I made 20 odd years ago but it might take a bit of searching to find! I did however find this piece of filet crochet which I am fairly sure is at least 20 years old. It is rather stained and I had a horrible feeling that I had washed it before putting it away, and after washing it again and not even slightly shifting the stain I'm pretty sure that this was the piece that was sitting on a stained wooden coffee table which got water spilled on it. I think the stain is wood stain which leached out of the wood. Oh well, I can always dye it!


And when I came back into the room after photographing this I was met by this sight.

It's blurry, but you can make out in Nicholas's right hand an empty overlocker thread cone, and on the floor in front of him the white thread which he has pulled off the cone. Sigh.

Friday, June 18, 2010

I guess I'm it

I've been tagged by Sherry of Pattern Scissors Cloth in a game of eight questions. I'm telling you now, if you've never read her blog, go now. This lady is a real live designer and patternmaker - her tutorials are BRILLIANT - really easy to follow and she covers all sorts of really interesting topics. I love me an expert and boy do I appreciate one who is so willing to share her expertise. anyway, enough gushing, on to the eight questions.


1, Which pattern/vintage style have you been thinking about lately?
Easy, I've been stewing over The One That Got Away. I spotted this Christian Dior evening dress pattern on Trademe last week, popped it on my watchlist and FORGOT ABOUT IT. I missed the end of the auction, where it failed to garner any bids. It could have been mine for $8. (Insert mental picture of my anguished wailing and wringing of hands right about here) It's been relisted and bidding currently stands at $10.50. I'm reluctant to spend too much on a pattern, no matter how intriguing, if I'm not sure I'll ever make it. I'll see what happens to this one, but boy am I annoyed that I forgot it! And yeah I know I could draft it. It may come to that. I tend to get "focussed".


2, What's the one place you want to visit that you've never been to before?
Again, easy. England. Not very precise destination I know! My Mum is English, as is my Dad's father, and I'd love to see where I come from. And while I'm there, the V and A beckons, as do one or twelve other museums......


3, How do you relax?
Relax? What's that again? Like many sewers, I sew to relax. I'm not sure whether it makes me strange that I find tedious, never to be seen handstitching (like the catchstitched seam allowances in my last post) restful. Other than slow, meticulous needlework, I go to the gym. It's my "me" time - All About Me. I feel better for the physical activity, I look better because of it, and that also makes me feel better, so it's an important part of my week.


4, What is your favourite holiday?
About 10 years ago David and I spent a few days in Fiordland. It is the only time we have ever been away by ourselves (we got together when I was a single Mum with a one year old). We drove Cayden to Wanaka to spend a few days with my parents at Glendhu Bay, then went on to Te Anau. We did a number of fun things while we were there, the best of which was an overnight cruise on the Milford Wanderer. I got my G&T on deck at sunset, but heavy cloud cover (hey, this IS Fiordland!) meant it was less than spectacular. As our only time away alone, it's a pretty special memory.


5, What is one sewing skill you want to learn/try out?
Where to start on this one? There are many, many things I want to try, but one I've thought of consistently is proper full-on tailoring. Oh, and a whole lot more about patternmaking than I know now.


6, Can you knit? Crochet? Other crafting talents?
Yes I can knit well. I like cables, lace patterns, tricky stuff. I love the look of stocking stitch but knitting it gets boring pretty fast. I really fancy the socks Sherry showed on her blog.....
I can crochet, but it's not something I've done much of, and I can't follow a pattern without a how-to in front of me to remind me what is a double crochet, treble crochet etc. I've also done a bit of cross stitch and very basic embroidery. I can't draw to save myself.


7, What garment/accessory do you wear the most?
Baring my soul, it's this cardy at the moment. (NB, this is the first time I've used the timer on my camera - all it took was a tissue box on the table and voila! Apart from the cartoon-esque glint off my front teeth I don't even hate this! Should have brushed my hair, but I'm not going anywhere today.....)

I made it when I was pregnant with the twins (lets face it, there was no way much else was going to cover me!) And I lived in it for the latter part of my pregnancy and all through the winter after I had them. It was great to snuggle a baby under while breastfeeding. I'm embarrassed to admit that the next winter and the next (this one) out it came again, and I wear it pretty much every day it isn't in the wash. The sleeves are too short (hey, I was pregnant, I thought I did well to grade and slightly alter a pattern that started at a size 44 [Burda WOF] when I needed a 36. I can't be expected to remember that I have long arms too.) The fabric is cheap synthetic, so it looks pretty dingy now, but at least it dries quickly after washing. It also hangs quite a way away from the front of my body worn loose like this (I had, um, quite a lot more front when I made it) so it does my figure no favours. You'd think I would have enough pride/class that I wouldn't wear it out of the house,but I do. Under a coat, but it gets out!

8, How much time do you spend reading blogs? (Per day or per week?)

Um, that varies quite a bit. If my sewing is frustrating me or just not inspiring me it can be quite a lot of the twins' daily three hour nap time. (Yep, just turned two and they nap for three hours. I'm not about to mess with that!) Usually about an hour or two a day. I can't help it that there are just so many clever people out there who blog!

And I'm choosing to answer 8b as well.

8b, your motto/mantra?
I have two. The first has been my signature line on Patternreview for all the years I've been a member. "There are no sewing mistakes, only opportunities for design features" It's been much commented on over the years, so I think I've struck a chord with a lot of people!

The other is our house rule - "Be nice or be quiet" Exactly the same sentiment as "If you can't say something nice..." etc, but it has an air of parental command about it! An implied "or else!" attitude that kids sometimes need. One day I want to make a wall hanging of this.

Now who to tag?

Keely of Keelysews who is my BFF in real life. Despite this I don't know her answers to these questions!

Kristine of Beangirl, who is just funny and clever and worth visiting just for the giggle even if she didn't sew.

Kathryn of Les Petits Anglais because I'd just like to know more about you!

Katie at Kaddidlehopper because she leaves such nice comments and makes such cute stuff.

Gail at My Fabrication because she makes beautiful clothes from beautiful fabrics that I love to look at.

And I'm going to leave it at that because some others I would have tagged have already been by others. My apologies if I've doubled up! I'd love to learn more about everyone. It's nosy, but so interesting!

Thursday, June 17, 2010

My Creative Space - dress interrupted

I'm playing along with Kootoyoo's Creative Spaces this week.


As much as I want to finish my dress, it's taking a backseat this week so I can make a top for a dear friend to whom I owe sewing in return for babysitting during the school holidays before I had the twins. Um, yeah, she's patient! (actually she waits till she wants something then cashes in a favour). Even if I didn't owe her sewing I'd want to do it because she's a) lovely, and b) a real pay-it-forward kind of person. She truly deserves a bit of pretty coming her way. Anyway, she's just undergone surgery and (as you do) needs a pretty new top. This is one that we copied for her from a RTW top a couple of years ago. By "we" I mean "me-while-she-sat-beside-me-saying-"uh huh"-at-relevant-points-and-feeding-me-Pinky-bars." I got started on it yesterday and quickly decided that it needed to be prettified. J and I have very similar taste so I am a little more confident that she will like something I like than other friends would.


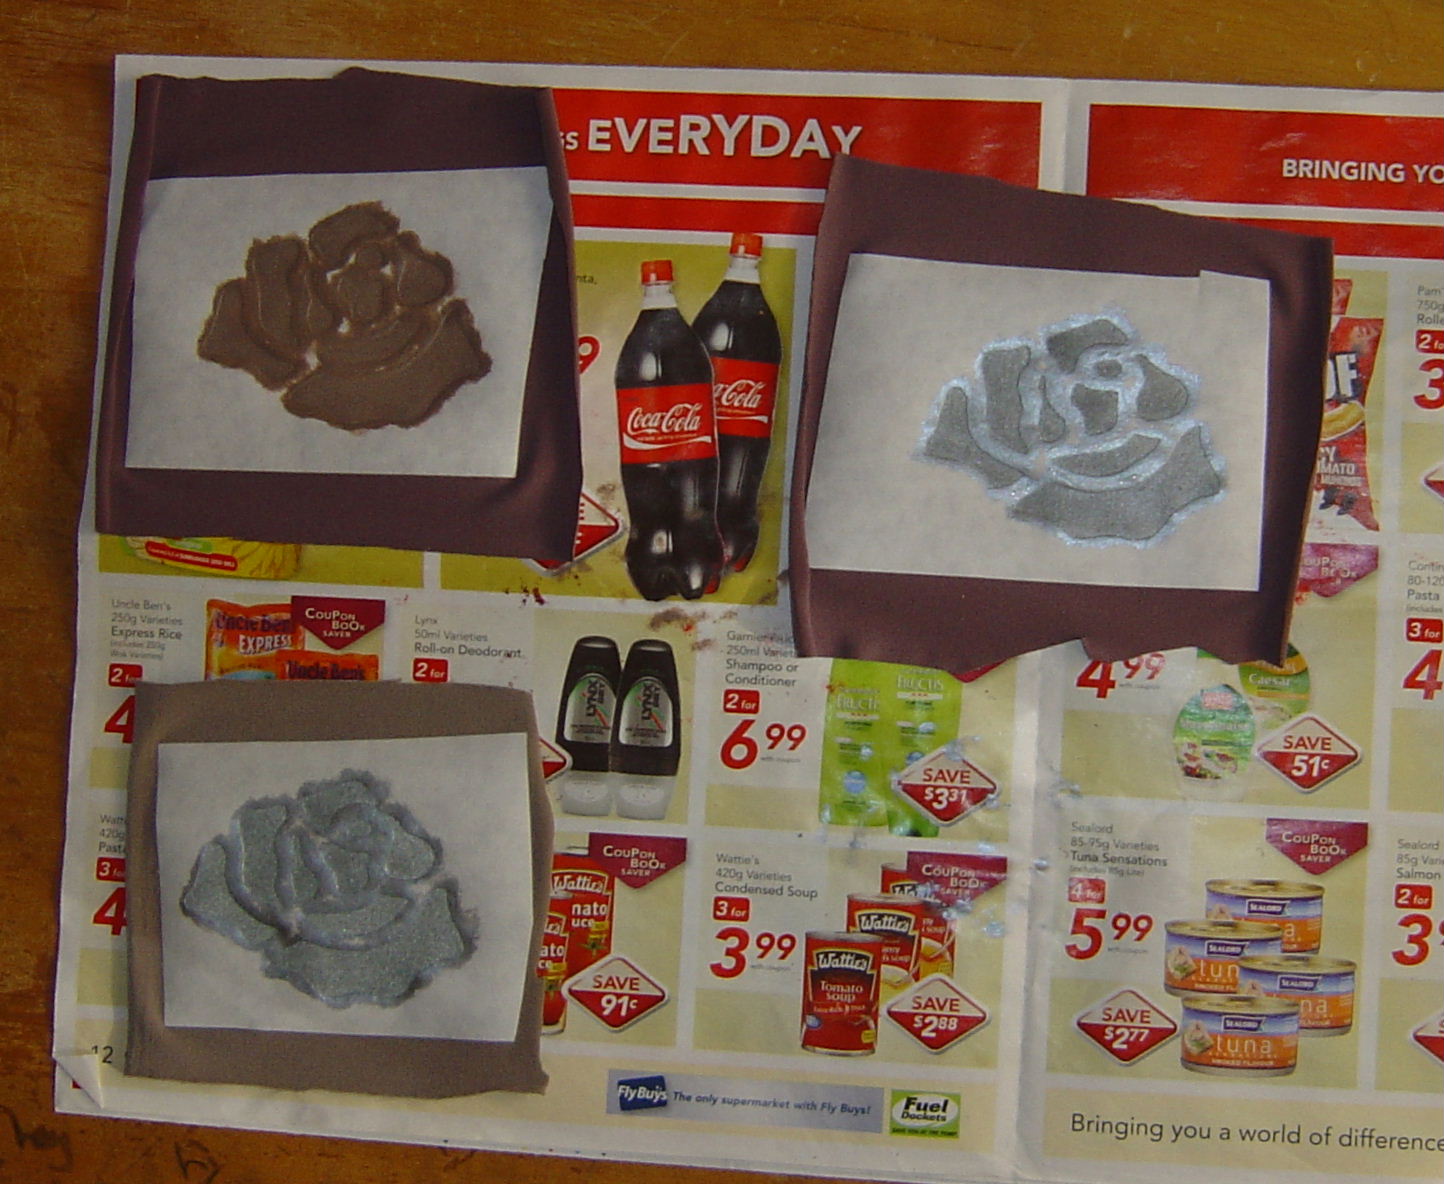
My first idea was to do a very simple applique using a running stitch around a stencil design then cutting away the excess fabric, a technique very similar to what I've done on my children's designs with an influence from the utterly stunning work of Natalie Chanin (if you've never heard of her, go and check out Alabama Chanin). After I'd done the first one I was not convinced. Here's the best photo I could get of the front of the top with one applique done and two others pinned in place.

I just wasn't feeling it, so I decided to paint a couple and see if they look better. Since they're on scraps of fabric there's no risk of wrecking J's top if it doesn't work or she doesn't like it. Two silver and one burnt umber, on two different coloured fabrics. Now to watch the paint dry......


.......and they'll look a little like this. Once the paint is properly dry and heat set I'll figure out how best to attach them to the top. I'm thinking of going back to the running stitch (with toning but slightly contrasting thread) and trim method.


And just to finish I thought I'd show what happens when you forget to cover (or lower, if that's an option) the feed dogs on your sewing machine as stated in the instructions before using your new favourite toy, the Greist buttonholer. I was trying to go around each buttonhole twice and the second one wasn't lining up with the first. After four keyholes and one short buttonhole (and several heart palpitations) I realised my mistake and covered the feed dogs. After which I got a beautiful short buttonhole and the most Perfect Keyhole Ever. I am so in love with this. I need to make myself a(nother) coat just so I can USE it!


And many thanks to Katie, who had the great, simple (and blindingly obvious to anyone other than me) idea of starting the buttonhole at a point other than the top with my other buttonholer - worked a treat!

Monday, June 14, 2010

Dress progress

Being pretty much incapable of just following instructions from the beginning and methodically working my way through to the end, I've completed the front and back of my dress before doing the much-less-interesting underdress (aka, lining). I couldn't wait to see how this was going to look! And it looks pretty much like this - a bit saggier than it should look on me as I am very slightly better endowed than my dummy and it's just pinned hastily together and unsupported by the underdress.
Front:

Back:
I'm really pleased with how all the sections came together and how nicely the skirt hangs - I was a bit worried that it would stick out stiffly. It wrinkles very readily, so I'm leaving it pinned to the dummy as much as possible. Even so I can see that it looks like I need to have at it with the iron again over the long skirt seams.


Once I'd got this far I couldn't avoid the underdress any longer. Well I could have, but it makes sense to have the foundation complete before determining any alterations to the side seams. The instructions have you fuse interfacing to all the bodice bits but I didn't have any nice knit interfacing around and no way was I fusing cardboard to this! So I opted to use lining as an underlining. It gives nice body to the bodice without compromising flexibility.

Hand basting all the bodice sections takes a while, but it's mindless work and rather restful. What does it say about me that I find this sort of task relaxing? Anyway, here's my finished pile of bodice sections, done while I watched Star Trek IV on tv.
I like the red underlining. It'll be totally hidden once the dress is finished of course but it was way more fun to sew than a dull colour!

Once they were all done I had fun fitting the bodice. On the dummy it's easy, but then I have to try it on me. I got sick of contorting myself trying to hold the sideseam closed and assess the fit and got David to pin it for me. He's willing and deft, but not used to pinning! Eventually we got there and I was able to determine that I did need to take it in under the bust but not much else. Once the seams were sewn, pressed, trimmed, notched and hand catchstitched (yes, hand catchstitched. Relaxing!) to the underlining it looks like this:
And that's it for today folks. The twins are snuggled in their cots for a nap and I am way too tired to do anything which requires me to think, thanks to a certain someone who shall remain nameless (but who's name begins with N and ends with icholas) who woke at 11pm and then at least once per hour, usually 3 or 4 times till 4.30am for no apparent reason. He wasn't fussing so I don't think it's teeth - he just wanted to sit up and take off his sleeping bag, and if I wasn't quick enough, his pyjamas too. Delightful.
Edited to add - the day has been saved from the blahs by the arrival of the post - containing my other Greist buttonholer! And it WORKS! Really really well! Oh happy happy me!!!!!

Thursday, June 10, 2010

It's alive!!!!

Well, it's working at least! My long-wished-for Gresist buttonholer, far from being in "good working condition", required two overnight spa treatments marinating in CRC and more than two hours over two days to clean off the old toffee-like grease with cotton buds (q-tips), rags and toothpicks (they turned out to be the best cleaning tools). After which I held my breath and fitted it to my machine and almost closed my eyes as I pressed the pedal.....


......and round she went! My first attempt is the straight one at the top of the pic below. It skipped a few stitches, including one big chunk on it's first round, but I just went around again and covered it better and after that it didn't skip any more stitches. Then I put in the keyhole template (which is what I wanted all along) and made two of those - each of the ones below has been stitched around twice and I think they look lovely. I am puzzled though by the odd extra bit at the top of each one - when I went around the second time I got the lovely rounded top and I can't figure why it starts like this. It's easy to pick out those couple of stitches, but I'm totally baffled as to why it does this. Apart from those few stitches the second round was exactly on top of the first.

As I showed them to David when he came for lunch I commented that it seems a bit weird that just a few stitches on a scrap of fabric can give me so much pleasure. He totally understands. Which may be why I married him ;-)

And in other news, I have now stencilled one panel of my Vogue dress. The design came from a beautiful book of William Morris designs for applique. Applique designs frequently lend themselves really well to stencilling, and I love these!

This panel is the front (believe it or not). The stencilled design will go from left shoulder down to right side.


The colours aren't great in this photo - dodgy light and basic camera. The red is more of a blood-red than the bright red ink (due to the grey base fabric) and the silver is metallic. On some angles, in some lights, the silver fades out of sight. I love how the design differs depending on your view. If I wanted the the colour to be less influenced by the base fabric I'd need at least one more coat, but this is exactly what I wanted so I stopped at two.

Tuesday, June 8, 2010

Bugger!

Humph. The end of the sentence I left hanging was .....reist buttonholers. I stumbled across not one but TWO on Trademe by the sneaky technique of trying Google instead of looking through the Tradme listings for machine accessories under sewing. For some reason both were listed under antiques and collectibles, and I was the only bidder for each! (Another case of bewilderment that I'm not fighting off other bidders with big sticks). I got them both, and the first arrived today. I paid $30 (plus postage) for it and it was described as being "in good working condition". I was very hopeful, but have enough cynicism to be a little wary of such a claim not backed up with "when I tried it this morning". I put it on my machine and gingerly pressed the foot pedal. The needle went up and down and the buttonholer did nothing. I said a few colourful words and took off the case to have a look inside. There is a thick treacly coating of very old lubricant preventing certain parts from moving freely. As I type it is sitting in David's shed having been carefully sprayed with CRC, which should remove the gunk so I can re-oil it and hope that this time it will work. The instruction manual suggests lubricating with petrolum jelly once a year. I think I now know what 20 year old vaseline looks like. There is no other indication that anything is broken or wrong with it and I suspect that the seller did not wilfully mislead me, but took his mother's word that it worked perfectly when she last used it - at a guess 20 years ago. I will send him a polite email, but I see no need to be too annoyed. I may be more annoyed when my second one arrives (end of the week probably) for which I paid the grand total of $5 plus postage, and about which no claims of being in working order were made. It appeared to be in extremely good condition and may well be in good working condition. If I paid $30 for a non-working buttonholer and $5 for a working one I may not be overly impressed. If it doesn't work either I'll probably take them both to my (retired-engineer-and-all-round-very-clever-bloke) Dad to see if he can make one of them go. David probably could too, but Dad has more tools.....


Just to give you something cute to look at after that long-winded grumble, here's Isabella modelling her new dress. I wish I'd taken her cardigan off so the dress isn't obscured, but you get the idea. If I'm very lucky I get three shots before she loses interest and wanders off. (And just for the record, I'm really glad I did go over All That Topstitching. And even more glad that it actually makes a difference.) She has a real thing for shoes - she is constantly wandering around in any pair she can get her feet into!

Monday, June 7, 2010

Cutting multisized patterns

That is a seriously dull post title isn't it? I wish I could come up with better ones, but sadly that is not where my creativity lies.

Anyway, getting to the point, I got my dress cut out yesterday (took almost a whole nap time!) and I thought I'd share a couple of things which make cutting a complicated or multisized pattern easier.

When I cut a tissue pattern I always cut it so that all the sizes are retained because you never know when you might need another size or to grade (which is a whole lot easier if you have three sizes intact), but it makes cutting to the smallest size a bit tricky, especially around curves. Also this pattern has long thin bits which are very prone to distorting when pinned to fabric (as all tissue does) To minimize distortion as much as possible I left the prong things joined together and used a BRILLIANT tip I found in Threads magazine (Issue 148, p22). I traced the cutting line with a sharpie marker - the ink bleeds through the tissue and leaves a mark on the fabric. Since it's the cutting line it's not going to show on the garment (it will usually be cut off by the overlocker anyway), and it doesn't damage the tissue - genius!

This is what the marked cutting line looks like when you take the tissue away - perfectly visible. I drew the notches onto the outside of the cutting line so I could mark them with snips into the seam allowance as I usually do when I cut.
The one above was done with a teal sharpie, the one below with a fine line black one.


Isn't that great? I used to do the same thing with dressmakers carbon and a tracing wheel, but of course the wheel damages the already flimsy tissue which is far from ideal. This way the pattern is undamaged, the marks are very accurate and best of all it's super quick and easy peasy.
Now I wonder if I could transfer the darts, tucks and other markings using a washaway fabric marker the same way - imagine the time that would save! (Although I do find threadmarking restful and therapeutic to do - time out in my somewhat hectic life!) Time to experiment I think. Right after I cut the stencils I want to use on this dress. That should take care of the rest of today's nap time. At least it'll distract me from the fact that there's no mail delivery today because it's Queen's Birthday. Hopefully my squealy exciting (well, for me anyway!) trademe purchase will arrive tomorrow. And, um, so will another identical item later in the week. You can never have too many G.......

Thursday, June 3, 2010

My Creative Space - It's all about ME!

When I started this blog it was supposed to be about the more interesting projects I undertook for myself. As life and designing for small children has taken control I thought it was high time I wrestled said control BACK! So for my visit to Kootoyoo's Creative Spaces this week, it's me time.

One evening last week I was idly browsing on Trademe (NZ's local version of ebay) in the pattern section when I came across an auction for Vogue 8417 . Uncut, my size, no reserve, asking for a $3.50 opening bid, free postage within New Zealand, closing in about an hour, no current bids. Um, what? Why am I not fighting off other bidders with a stick?! There should be people all over this pattern! So of course I stayed hunched all over the computer till the auction closed, when I as the only bidder happily scored this pattern for $3.50! And today it arrived - about 10 mins before the twins went down for their nap. Does life get any sweeter? (Well, it does actually. In a couple of days I should receive the Other Thing I bought on Trademe, and believe me, THAT made me dileriously happy!)

Having all sorts of curvy seamlines and tucks which will make alterations seriously problematic once I cut the fabric, I flat measured the underdress to quickly assess fit before a more accurate tissue fit on my dummy, with the plan to mock it up in fabric if required. If the underdress fits ok, the dress itself should too. I hate pattern tissue and trace where possible, but the sheer size of the pieces for this dress made that impractical. Fortunately the underdress pieces are small and manageable so I traced them to tissue fit, then use. (I would like to add here that I've made enough Vogue patterns in my time to know that this is almost always enough investigation for me to go ahead with a pattern. I shouldn't need much more than a slight tweak here and there to get a good fit. Please don't hate me. Someone has to be average.)


Here's the underbodice on my dummy, set to match me. I have very similar proportions to the dummy so it's a fair representation. It has more ease than needed, but I suspect that by the time I have two layers of fabric (although thin) and the weight of the skirt pulling it down a smidge it will fit pretty well. There are seams at the sides, so a bit of altering there will be possible. Phew! This is one pattern that makes me very happy that I generally don't have to alter commercial patterns in any significant way. No way I'd want to undertake an FBA or SBA on this puppy!

The grey fabic is my dress fabric (from stash - perfect!) and the red is a bolt of lining I bought for $2.00 (for the whole bolt!)a couple of years ago because I needed a small amount for something and figured that I'd use another 10-ish metres of red lining eventually.

The weather here is turning decidedly winterish and as usual makes me long for bright colours. Red to me always says winter. A nice cheerful lining on this dress will perk me up every time I put it on. There will be some red on the outside too, but I have yet to decide what form that will take. If you've seen my kids designs you can probably take a wild guess.

So, after tissue fitting the underbodice I had to make a start on cutting this slightly daunting pile of tissue. (Please excuse the green overlocker thread cone in the picture. The twins think it's great fun to play with and it turns up all over the place)


And after a while I ended up with this pile of cut pattern pieces.

And with not enough time to press the wrinkles out of my fabric and cut the dress before the twins get up after their nap, that's it for today. I'll blog the process for this dress because I have a few tricks to share, and quite frankly the project excites me!
There will be some embellishment. Possibly using these.
Oh be still my beating heart - just look at the shapes of those pattern pieces! My excitement level over this dress (not to mention my serious over-use of exclamation points in this post) is a pretty good indication that it is high time I made something for me - something that makes me feel the way my flippy skirt did a couple of weeks ago.

Friday, May 28, 2010

So close......

Take a look at this dress. Anything strike you as being not-quite-right? Something which if done a little differently would make the design sing instead of hum quietly in the back row?

Here's the back. Spotted anything yet?


No? Bugger. It's only me who thinks the topstitching is too wishy-washy? I really really really need to get over myself? Yeah, thought so. (In my partial defense, I had a hell of a time photographing this - the topstitching must like the camera, because it aint popping in real life!)

I made this dress for Isabella. The embroidered denim is so soft and I love the muted shade, but it refused to tell me what it wanted to be till I came up with this design. It WANTED to be this dress, but I think it was wrong. The seamlines which took me a very long time to sew did not pop as they were supposed to, and the topstitching didn't help. The big design feature of this dress is the zig zag seaming and it sort of gets lost in the embroidery, which is louder than the topstitching. So after thinking (stewing) about it for a while I came up with a solution. (No way was I unpicking all that topstitching and redoing it with two strands of thread or topstitching thread like I should have done in the beginning!) I went over it again. Or rather, I'm going over it again. It takes a very, very, very long time because it Must Be Right, which means that I have to wheel the sewing machine by hand to ensure that the needle exactly hits the existing holes. And you know what? Take a look at this photo.

You can hardly see the difference! Mostly that's the photo again - in real life the difference is more apparent, although subtle. (In the above picture I've gone over the upper stitching and the lower panel in the middle right.) However, when I glance at the dress sitting on my desk the doubled stitching does noticably pop out a little more. The effect will be more pronounced with all the stitching done. If this was to be sold I doubt I'd have gone over it, but it would annoy me every time Isabella wore it, so it Had To Be Done. It will take a couple of hours and nobody but me would have noticed. I bet everyone reading this is rolling their eyes and yelling that I should get over it. (I know, I should.)
On the plus side, I'm really pleased with the colour combination of the denim and facing - it's a lovely soft yellowy green. Is this colour called celadon? Anyway, I love the two together, and I totally love the tree. Stenciled in black from the Duplo robot tree I photocopied. Done in black as directly inspired by the beauty on Foxs Lane here (although I also absolutely love this one too) Hers are screenprinted directly onto vintage sheets, and the crisp sharp black looks stunning against their slightly faded softness. Mine was stenciled onto a scrap of the facing fabric then sewn on and trimmed.

So, when I am finished the other 7 skirt panels and resewing the hem (which I did undo so that I could do my restitching past the hem fold or else it'd look funny) Isabella will have a new dress. (Poor girl will spend her life dressed in prototypes!) It'll look so cute with the red rose patterned tights she's inherited from Georgia.....

Thursday, May 20, 2010

My Creative Space - covered button tutorial

I'm playing along with Kootoyoo's Creative Spaces again this week.

Today I bring you covered buttons, but not the kind you buy in kit form and cover. I was wandering through town a few days ago and saw something like this on a jacket in a shop window and my brain just about exploded with approximately four trillion possible variations.

This is what my first two (very quick) versions looked like.

To make them you need either buttons, flat with holes or with a shank, (mismatched or ugly buttons would be great) or something to use as a button form. A layer or two or three of firm plastic cut into any shape and size you fancy for a button will work perfectly. I reckon old ice cream containers would be ideal. (Not that I have dozens of them lying around or anything you understand). Just cut your desired shape and poke holes so it can be sewn onto something. Also some fabric, preferably one which won't fray. (If you use a fabric which will fray you can always dab fray check on the edges.) I can see this idea working brilliantly on some of the stunning felted wool jumper refashions I've seen around the place. And thread - embroidery floss or regular sewing thread, whatever you like!


First place a button between two layers of fabric. (Note to self - desk surface looks horrible. You really should sand and refinish it to get rid of that nasty rough surface)


A few pins around the perimeter to keep it in place. (Is that how you spell perimeter? It looks a bit odd to me.)


Then with floss or thread and a simple running stitch, stitch around the edge of the button. My fabric was pretty thick and fuzzy, so I used 6 strands of floss.
Then trim away the excess fabric beyond the stitching.


To attach to your garment, you need to find the button's holes and stitch through them. After sewing it on with regular thread, go over it with embroidery floss to match the running stitch.
Easy!

To use a shanked button, poke a hole just big enough to squeeze the shank through in a scrap of fabric, then proceed as before sandwiching the button between two layers of fabric.


To make it more interesting I did the most basic lazy daisy embroidery on the scrap to be the face of the button. The sky's the limit for embellishment here! This time I sewed the two fabric layers together with matching sewing thread before trimming away the excess.


Then went around the edge with a simple blanket stitch for a different look.


So there you are - a very simple idea which lends itself to infinite possibilites for unique and perfect buttons for deserving projects. It would be great for brooches too, just sew or glue a brooch back to the finished button. I can see one or two (or three...) as the finishing touches on a bag, one single giant button pinned over a simple fastening on a cardy - I'd better stop before my brain really does explode. Oh how I love possibilities!
If anyone makes these, please let me know - I'd love to see what a creative mind can do with this!
Oh yeah, and I obviously didn't invent this idea, but I haven't seen it anywhere else, so I'm hoping that I don't have a bunch of readers rolling their eyes saying "That tired old idea again!" and yawning. Hopefully someone else will find this as intriguing (now there's another word I'm never sure how to spell) as I did.

Wednesday, May 19, 2010

Dreaming of summer.....


This is the first time I've made something with a hypothetical potentially international market in mind. I haven't managed to talk myself out of a shop on Etsy yet, so I thought I should make some things which are geared to a northern hemisphere summer. Light blue cotton drill, teal piping, and teal and green stencilling with a seaside theme - laying on "summer" with a trowel!
Which on this grey dreary uninspiring autumn day makes me long for the long hot days of summer. (Yes Dunedin does so get those!)

Friday, May 14, 2010

What a difference a skirt makes!

I've been thinking about my image lately. Like most women I'm not happy with how I look. Mostly I'm happy with what's under my clothes, (I eat well-ish, I work out regularly) but I dress like a frumpy housewife. I fall into the trap of not bothering to dress up because so many days I spend all my time dealing with children and not even leaving the house. If nobody but my family is going to see me, why bother?

I have lots of lovely clothes in my wardrobe, made when I worked in my BIL's hair salon. I have very large boxes filled with fabric I love, and enough pattterns to last forever. Not to mention the know-how to create my own, should I so wish. So I have no excuse to dress like a frump.

A few days ago David found some photos of a holiday we went on 10 years ago to Fiordland (the only time we have ever been away with no kids - Cayden spent a few days in Wanaka with his grandparents and it was a year before we had the next one). So there I was, 30 years old and having had only one child, and the thought that I couldn't get out of my head was that I look better now than I did then! But quite frankly, who could tell?

And that got me thinking that it is high time I stopped dressing like a frump and started working those lovely clothes into my wardrobe. Today I had some errands to run in town, and I decided to get out something nice to wear, as opposed to the something tidy I usually reach for. And when I started the archaeological dig required to peruse the long unworn contents of my wardrobe what do you think I found? This skirt. I made it before I had the twins and loved it, and had never worn it because I couldn't think what to wear with it! Time to change that! A good dig through my drawers'o'tops produced this one (well, actually first it produced a dull gold one identical to this one, till I remembered this one and thought it'd work better). I wore a little black cardy over it, but David said to take it off for the photos he took when he came home for lunch. He said lots of other stuff too, but that's private ;-)

And all day I've felt like this.


Here's a boring frontal shot to show how it sits when I'm not swishing.

When I looked in the mirror this morning I thought "nice legs!" and I hate my legs and their cankles, so that tells you something!
For the record, the skirt is Butterick 4859. And the top is a Burda one which I can't currently find on their site because a server somewhere appears to be down. Next time I make it I'm going to bring in the shoulder. I don't think that hanging off the shoulder point does me any favours - my shoulders and arms are my best bits and would be shown to better advantage with an armhole that shows the top of my arm.
So there you go, I've decided that I want to feel like this all the time. I need to work out how to incorporate the lovely items from the depths of my wardrobe into outfits I can feasibly wear to play with the twins and walk down to school. I'll keep you posted.

Wednesday, May 12, 2010

One more done

Are we sick of bubble dresses yet? I'm really liking the softer wintery colours of my newest creations, and the pop of the stenciled designs that makes them distinctively mine. How about some plaid on the bias - why didn't I think of bias before?!


And a rose because it's pretty.


I've been mulling over the online shop idea and peeking around etsy and pay-pal. It's going to take a clear head and a few cups of coffee I can tell you, but I'm pretty well decided that there will be an online shop in my not-too-distant future. I will build up some stock though, and I also need to have a good think about what I should make - a small number of styles in different fabrics/colours? Or would a larger range of styles in smaller numbers have the widest appeal (more obviously unique)? So anyway, it won't be immediately.

Oh, and Kathryn, the tree dress is one of my own designs. (The tree is a duplo piece, from their robot line a couple of years ago. I photocopied it and added a bit more trunk.)

Tuesday, May 11, 2010

Finished stuff

I finally got the paint colour I wanted and finished this dress. I love the sound of "burnt umber". It sounds so autumnal and perfect for a tree I think. Usually paint colours' names are, um, creative, but this one just sounds right.
Anyway, this is what burnt umber looks like painted onto dusky pink satin, sewn onto a sage green dress.
Now, do I keep it or sell it? I still haven't tried it on Isabella, largely because she has a cold and I keep envisioning a huge messy sneeze just as I pull it over her head, and then deciding that it isn't her colour and I shouldn't keep it.

The other finished garment is this dress. Another one I really like - oh how I love seaming concave and convex curves together - especially with piping in the seams.

The printed panel on this one was done with a craft punch and freezer paper, but I have visions of this dress done in any number of ways - contrasting fabric for one panel, closely toning different fabrics for each panel, different seam treatments, heavy winter fabrics, lightweight summer fabrics.......