Showing posts with label Oxshott tots. Show all posts

Tuesday, April 30, 2013

Spiral dress prototype.

Firstly, thank you for the supportive comments on my last post - I pretty much never share my opinions on controversial subjects on the internet, since it is a terrible place to try and have a reasoned and civil debate!  This was just one subject on which I wanted my support to be on the record.

So, back to sewing.  I saw this great idea on pinterest, as one does. (It comes originally from Fashion Incubator.) A spiral cut dress.  What a neat idea I thought, I'd love to try that for Isabella!  So I did.  Starting with a size 7 block, it was pretty straightforward drafting.


This shot gives a better idea of the shape, and shows how the panels spiral around with no side seams.


I'm a bit "eh" about it, which is fine, as it was intended to be a prototype.  Since I knew it would at least be wearable I finished it to be worn, and of course Isabella loves it!  I am going to have another crack at the skirt portion of the draft, this time with considerably more flare - this ended up more A line than twirly.

The twins turn five in a few weeks, and I'd like a better version of this to be Isabella's birthday dress.  Probably pink.  My girl loves her pink. There are six panels so it can be made with one, two, three or six colours!  I wonder how a rainbow would look?

Thursday, March 21, 2013

What used to be jeans

Recycling, upcycling, refashioning - call it what you will, I love turning clothes I won't wear into something that someone will wear.  This dress started life as a couple of pairs of jeans and a shirt which came in a bag of hand me downs, which sadly didn't quite fit me.  Since the jeans had wide legs I figured I'd harvest the fabric and make Isabella a dress.  This one is based on a size 7 (Aldrich, naturally) block, so is roomy and long, but wearable.

This shot shows the petal sleeve a bit better.


And the back.  I reused the pockets too.


I don't like to waste the unused bits of clothes I cut up, so the leftovers of this dress (and a few other rework projects) are destined for another life as various things.  I have so many pins on Pinterest of things I want to do one day.  Seriously, I'll have to live to be really really really old to do everything I've ever wanted to do!

And poor Isabella didn't get this dress till today because she was unable to wear dresses for a week and a half because of this.


She took a tumble from a four foot tall jumping box at kindy (thanks to a shove from an impatient class mate) and landed awkwardly on her foot.  An x ray showed no break, but apparently it can be hard to be sure in young children, and it was clearly badly sprained so they put this on - partly plaster, partly cotton wool and bandage.  She spent 12 days crawling, riding on her three wheeler and being carried.  No dress till she was walking again.  The cast came off on Tuesday and she is now limping around like a champ, and delighted to get a new dress.

Wednesday, May 23, 2012

Dress for Isabella.

I started with this shirt, bought unworn, with tags, for $2 from the Kindy fair left overs. (New price $69.99).  Nice soft slightly brushed cotton.  Not a style or colour that David would wear, which was fine, because I had designs on it for something else.


A few polka dots in two different sizes stencilled on with freezer paper (thanks J for the circle punches!)


And I ended up with this.  Because little girls who are turning four tomorrow NEED a new dress. I think it's a rule.  (Little boys who are turning four tomorrow don't need a new shirt because they have yet to outgrow or wear out the new one Mum made last year!)


Piped peter pan collar and petal sleeves in a red I chanced upon in a remnant bin which matches my paint really well.  The original front button and buttonhole bands are now at the back.  I did have to add a little yoke to make up length.

And some inseam pockets inspired directly by this dress on Pinterest.


I decided to photograph the dress today because when we get home from kindy tomorrow it will probably be covered in mud, paint or food.  Or all three.  Which is as it should be when you are four.

Monday, March 19, 2012

At what point am I officially obsessed?

I got this far on my sister's Alabama Chanin corset top - centre front panel stitched, beaded and snipped.


Then I ran out of beads. It'll be a few days before she gets more and I tell you I was positively ITCHING to do more. You know how it is when a project gets under your skin and you just can't settle to anything else? So I started this:

It's the tank top from Alabama Studio Style, with their paisley pattern, which can be downloaded here. I have decided that I require a hand work project of some sort to be at hand at all times. Something I can easily pick up and put down frequently and which can be abandoned at any point when required. (Machine sewn projects are harder to drop instantly when someone screams.) And which can be worked on while parked on the sofa watching tv in the evening.

So, I have completed three hand sewn corset tops for me and have the fabric for a dress (once I decide on embellishment), I'm in the middle of a corset top for my sister and have started a tank top for me. I think I need a shrug or bolero in this style as well..... These garments take a Very.Long.Time. (an estimated 80 hours for the first one I made) What possesses a rational person to want to spend this long on one garment? More than once? I just find the whole process so enjoyable - it's very relaxing and somehow the fact that it is going to take so long makes it easy not to be in a pointless hurry, which is a big contrast to most of life! (I'm a process and product person - I enjoy the process as much as the finished result.) I thought the first corset top I made would have scratched the itch, but all it did was inflame the passion!


I haven't abandoned my beloved sewing machine though, I made a pair of pants for David to wear to work, and these for Nicholas:

We both love the dragon freezer paper stencilled onto contrasting fabric then appliqued on.

I've drafted this design from a couple of different blocks, and annoyingly grabbed the wrong one (regular fit) instead of the slim fit Nicholas needs. Oh well, I need to make him more anyway.


And in closing, here's a random twin shot.

I keep saying, twins are funny.

Monday, February 20, 2012

Bartering

I have been bartering my sewing services for things I want or need for almost as long as I've been sewing. I love the idea of trading expertise I have for expertise I lack! (which reminds me, I owe my friend with the embroidery machine a pattern from ages ago - yikes that's slack!) In this instance it was a way of getting something I really really wanted but didn't need. (With five children there is always someone who needs something more than I do.)
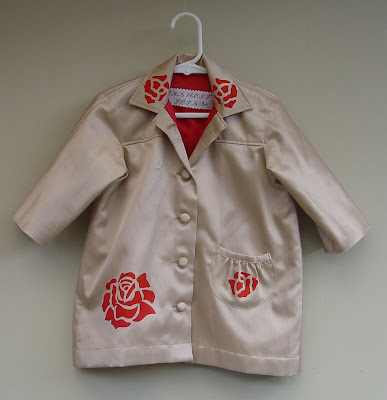
My younger sister asked if I could make a jacket for her and two friends to give another friend who had recently had her first child. They wanted to give her something special, custom made. Which led straight to me. This is the jacket whose hood was giving me a headache a couple of weeks ago. Size two, modelled very willingly by Nicholas. Aged three years, nine months.

The recipient has one English parent, one Kiwi.


And this is what I asked for in return.


I've been through it cover to cover several times since she gave it to me last night. I love everything about Alabama Chanin, from the design aesthetic right through the simple but time consuming techniques and on to the championing of sustainable living. I have never been a designer groupie, but I love Natalie Chanin. If I ever win the lottery I'm going to Florence Alabama for a workshop. Or twelve.

Anyway, I have fabric already for a dress, but have much musing to do over it's embellishment before I start. I also have to finish this.

Yep, doing another one. This one is for my younger sister (the same one I bartered with for the book). She has always really admired the corset tops I've made for myself, and wondered whether she would be able to make one herself. Which she would, but I offered to make her one. There is a very very VERY short list of people for whom I would spend this amount of time and she is right at the top, for a lifetime (well, after we got to our teens and stopped fighting) of generosity and generally being great. I joked to her last night that I was so desperate to make another one (I love the process that much) that I'd almost have paid her to let me make one!

She chose this petrol blue (I laughed my head off when I saw it because I chose the exact same colour the same day for my dress-to-be!) with a white underlayer. Because there wasn't to be any painting I figured that the easiest way to mark the roses on this dark colour was going to be good old stitch through a tracing then pull out the paper.


And in parting, a shot of Nicholas proudly showing the lining of his jacket. (Which I originally made for Cayden!) He is obsessed with Thomas the Tank Engine and despite wearing this jacket last year only just noticed the lining a couple of weeks ago. Now he does this to anyone who gets close enough.

And because my twins now each have to do anything potentially fun looking that the other does, Isabella wanted a shot of her coat lining too.

Twins are funny.

Thursday, January 26, 2012

The Jinx Dress

I don't name my creations as a rule, but some acquire a moniker as I go along. This is most definitely the Jinx Dress. It felt like the entire process was jinxed from the get go! Looks pretty innocuous doesn't it?

I am very pleased with the fern, but I would prefer it a little lower I think.


Yet another item created from other people's discards. In this case, cast off jeans from David and my BIL. Worn through in the butt so they weren't worth mending, the legs were good enough to piece into this dress. After I got over this hurdle.


Once I persuaded Nicholas that it would be much more comfy to snuggle on the sofa I was able to cut the pieces from the jeans. And then they fought being made in every way!

My worst problem was when I sewed the dress shoulder seams and facing shoulder seams, joined the pieces at armholes and necklines with the intention of turning them right side out through the shoulders before sewing side seams and finishing armholes. The point at which I realised I had not turned the dress right side out was after sewing and overlocking both side seams and doing two rows of topstitching on one of them. Yep, said some bad words.

I had multiple thread hassles - not enough topstitching thread (I had some more in a different brand which was close enough that I figured to h*** with it, it's not for sale and open to public scrutiny!), running out of bobbin thread 10cm from the end of the last row of hem stitching, and most intriguingly, going to the ironing board to give the completed hem a final press and finding a section of hem with no bobbin thread. I assume it broke and somehow caught up a new loop, but I've never had that happen before! I had limited topstitching thread for the hem so I couldn't just redo the whole thing (which I would prefer) and it has so many starts and stops in it! The teeth were gritted so hard by this point I expect the surfaces are flat.

Anyway, it was always intended to be a trial, to be worn by Isabella. Good sturdy Kindy dress which cost nothing but my time. Here's her verdict.


And here's my last teeth-gritting realisation.

It's more obvious in real life that the denims for back and front are too different. The back is heavier, which I don't mind, but it's blue blue while the front is made from two pairs which were more black blue. Damn! I like the original side seams on the back pieces but after the dress was made and on her the glaring difference in tone between front and back jumped out at me. Next time I should have some of each fabric in the front and the back if the contrast is too great.

Repeat to self: it cost nothing but my time, it's for kindy, it'll be covered in paint in five minutes, she loves it......

Sunday, January 22, 2012

Showing my roots

No, not the ever-increasing collection of grey ones on my head, these roots:

My Mum is English, as is my paternal grandfather, but really that's just an excuse for the fact that I've always liked the Union Jack (which I vaguely recall hearing on a Dr Who episode is really the Union Flag unless it's at sea) as a graphic image. And I like how it looks on clothes. The NZ flag is a Union Jack in the corner of a navy blue flag, so it's pretty much my flag too. The idea of appliqueing the flag onto a simple dress has been percolating for a while, and yesterday was the day.

This one is for Isabella. I'm trying out my size four A-line dress block on her(104cm height). As she won't be four till May, I'm very happy with how this fits her. The slight rise at the armhole edge of her left shoulder is the most obvious sign that the dress is a bit big, and within my "I can live with it" tolerance. She is a very enthusiastic and willing model.


But "stand still" pretty much doesn't register at all. That blur to the left of her visible leg in the pic below is her other leg.


Being the stickler for accuracy that I am I didn't want my Union Jack to be reminiscent of the flag, I wanted it to be precisely correct in it's proportions. (Yeah, accuracy in proportion is one thing, colour is another!) It took three seconds on Google to find how to accurately draw the flag, and from there I made a full-scale diagram on a full-front pattern outline. The photo is a bit faint, sorry.

Detail.

After cutting the fabric strips and stitching them on the front looked like this.

I spent as much time with the iron as I did with the machine I think - making sure all the fabrics were perfectly wrinkle free before marking and cutting the strips (with scissors because I keep forgetting to get new rotary cutter blades) and after applying each strip, none of which are fused in any way. Not to have pressed every time would have invited distortions, which would magnify with each successive layer. If you want to know more about why pressing is so essential, go read the Pressinatrix.

I could reduce the thickness of the appliqued layers by stencilling the red areas onto a single cut out of the white areas, which I think would be sensible for smaller sizes.

Monday, September 26, 2011

Since June?! Really?

I got an email from the shop where I have my designs on consignment suggesting suppliers might like to think about spring/summer stock because it's about to be cruise ship season. Good idea I thought, and got sewing. After completing a dress and getting out my tally list I discovered that it was the first garment I've made since JUNE! (And there was only one that month). I guess my winter apathy is worse than I thought! Anyway I've been sewing up a storm for a couple of weeks and yesterday delivered all of these to Little Chalmers.


Well, this one was all done but for the buttons for probably about a year. I was terrified of mangling a buttonhole on the satin and ruining the whole thing. Naturally once I got started the Greist (buttonholer) behaved perfectly, as always, and everything is fine. I feel like an idiot for worrying. Nothing new there.


Fairies. I actually designed the fairies myself by manipulating croquis and wings. I really like them, so I hope some little girl sees them and begs her Mum to buy the fairy dress. (I originally made this design for Isabella to try out the back fastening and V front and back. She's been wearing that dress for almost a year and it's been great, so I'll call that trial a success!)


This is New Zealand. Silver ferns are pretty much mandatory.


Butterflies.


I really like the colour combo and spot applique on this dress. The idea for that came to me when I was lying in bed one night and I was terrified that I'd forget it by morning! Obviously, I didn't. The butterflies in the dress above are the same tecnique, but I think it's less successful with the gingham. I'll do it again though!

Now I have all that out of the way I really should get on with one of the seventy squintillion projects in various stages of planning for meeeeeeeeeeeeeeeeeeeeeeee

Tuesday, May 24, 2011

I Demand A Recount!!!

According to the calendar today is the twins' third birthday. It can't be three years since they made their seven-weeks-early entry into the world!

It is incredibly hard to get two three year olds to cooperate for a photo intended to showcase their new clothes.
Isabella's dress is the one I made a couple of months ago and wasn't happy with. Yesterday I suddenly thought that adding godets would provide the needed fullness, and sat up feverishly sewing till after 11.30pm to finish it. It wouldn't have been so late if I hadn't also had to sew a new shirt for Nicholas. He has seen the robot stencil appliques I've put on other things and rather plaintively asked "My ah-but?". So I made him an ah-but shirt of his own. I also made him new trousers. (I only had the hems and elastic to do on those yesterday though). He chose the dragon applique and when shown them yesterday afternoon insisted on putting them on immediately. (The gigantic sweatshirt is the one he wore home from kindy after playing very enthusiastically with the water table).
Just as well I took the pic as soon as he put them on because about 30 minutes later I was reminded that small boys who are not long potty trained shouldn't be put into new trousers which you want them to wear the next day.
I love this stretch corduroy but my overlocker hates it so I had to zig zag the seam allowances. Thank goodness for my walking foot!

Friday, April 8, 2011

Coat for Isabella

While I was pretty happy with progress on Isabella's coat the motifs on the front just didn't quite look right. The lightbulb moment (also known as the Attack Of The Blindingly Obvious) was reading Gail's comment - that she'd wear it sans motifs. Um, yes. It immediately brought to mind a picture of the coat without them, and the obvious solution - take some off. I only unpicked the top two and bottom one, which I think improves the balance considerably.

The buttonholes are made with my Greist buttonholer, which I love so much! Keely helped me pick buttons when we actually managed to meet up in person this week! (By "helped" I mean "distracted the twins while I looked at every button in Anne's and Threads")


Hard to photograph without it collapsing and hanging oddly. I need a child sized dress form.


And in other squealy excitement, this is currently drying on my kitchen bench.


Can't make it out? Here's a closer shot.


The logo designed by my clever friend, printed onto fabric with my computer printer! I used this tutorial, and it is so easy it's fantastic. Once it's dry I still have to heat set the ink with the iron, and do a test wash, but apparently they work really well. I can't wait to see how they stand up! I would love to print some vintage dress form images I have and make them into a collage to hang on my wall....

Monday, April 4, 2011

New stuff

I very firmly believe the adage that it aint what you know that counts, but who you know. I ran into M at her work a week or so ago (as opposed to running into her at our fortnightly craft nights, at which she is FORCING us to make a quilt. There you go M, I complained!) She mentioned running into a former colleague who has just opened a shop in Port Chalmers to sell locally made baby/kid stuff! Does that sound like me or what?! She suggested I contact her to see if maybe there'd be room for me. So I did, and yesterday I went to see her with some things. All of which are now in Little Chalmers on my behalf. I love designing, patternmaking and sewing. Don't like promoting myself, so having my things in a shop (on consignment) suits me perfectly!

Here's the latest crop. A bubble dress, modelled by Isabella. So willing. So unable to stand still. (I do love this shot though.)

Shirt.

Trousers. Not sure why the photo of the back is first, but it's too much trouble to shift them around before I post!
Front. I love the robot stencil. I have discovered that freezer paper stencils can be used more than once, which is great!

Here's Isabella in the altered Heidi dress. I re-cut the sleeves to be un-gathered petal sleeves which vastly improved the balance of the dress, and sewed buttons (from the shirts used) to hold the straps. Better.

Progress shot of Isabella's coat. Facial blurring done by Isabella, not me editing.
Back. Really loving this.
I still have to do buttonholes and buttons on a couple of things, but that means hauling out Georgia's sewing machine since it works much better with my buttonholer than mine since it actually sews slowly. Which mine doesn't. So that won't get done till the twins are in bed or at Kindy.