Thursday, August 5, 2010

Vionnet toile #2 on me

Between a temperamental computer and blogger being picky I figured that rather than edit my last post to add these photos I'd just post again.

So here it is on me, now with seam allowances around the armholes cut away as well so this is the current toile's finished size. (And not only is my hair brushed, but I've also run the straighteners over it. Not for blogging pride I'm ashamed to admit, but because we're going to Georgia's intended Intermediate School's open night this evening. Out in public=tidy hair)


I am really really pleased with how it's looking. The "bubbling" of excess fabric over my hips and odd fall of the back skirt's side seams below this are almost certainly due to the uneven match of seams between waist and hip. Just to check I'll probably adjust this toile and press the seams. As it is it makes my butt look huuuuuuge. (So we all know it'll be fixed in the final garment!)
It isn't perfectly flat across my lower back, but a more drapey or stretchy fabric may address this. I still can't get over the fact that such a fitted dress fits over my head with no opening. What a perfect dress.
Any suggestions/opinions very welcome.

Vionnet toile #2

Ta DAAAAAAA!
Front:
Back:
A couple of quick notes - I've cut away the seam allowances on the neckline, so this is the finished neck size, but I haven't trimmed away the armholes, so they will be 2.5cm smaller. The skirt is just portions of the total, cut on the correct grain, incorporating all of the seams but not all of the length, to save fabric and time. (I actually quite like it!) And it isn't pressed at all.
I can't believe it only took two toiles to get it to fit! (It helps that I'm not wildly different in size to the original wearer.) I was so eager to get the alterations done that I forgot to photograph how I added in the extra. I'll explain as best I can.
By measuring the sewn-up toile #1 I worked out that I had to add about 8cm to bust and waist. This is a very managable figure - 2cm each at CF, CB and side seams. Pretty straightforward - on a traditional pattern with side seams. I established where the sides were on my toile and marked that on the front pattern piece. Then I drew a line perpendicular to the CF onto the piece, making sure it went through the sticking out bit which contained the sides. I traced the stitcking out bit and slid the tracing 2cm along the perpendicular line, then blended the lines back to the original at the armhole and to an added 1.5cm along the hip bit I'd added to be safe, I figured I could always take it out) I just added 2cm to the CF. It'll lower the neckline, but since it's quite high that won't be a problem. To the back I added 2cm to the CB by tracing the original toile right down to where it curves in at the bottom. There I pivoted so that the original lowest point (at the CB) was on the new moved CB line. That just meant that I hadn't changed the length of this section and wouldn't need to alter the corresponding skirt piece. It's such a small amount I've changed the angle that I'm not worried that it'll affect the drape of the skirt hanging from that seam in any noticable way. I didn't have to touch the back skirt pieces, and the front skirt is a simple quarter circle with a right angled triangle cut off the top. Since I'd altered the section to be joined to the front skirt I worked out how much to cut off by measuring the lower bodice edge and applying pythagoras. I wish my kids had been around at the time so that I could have lectured them sanctimoniously on how useful mathematical theory is in the real world.
A bit of feverish haste to sew and slip it over the dummy and it FIT! Just like that! So I tried it on me. To my complete and utter astonishment, it fit me too! Now this is a relatively fitted dress with no fastenings - the stretchy nature of bias is what enables you to get it on and off. M Vionnet was one very clever lady. It's tight across the bust but otherwise damn near perfect. I was twisting and turning to see the back in a tiny wall mounted mirror but David said that when I stood still the back was perfectly flat. So I drafted and cut out sections of the skirt, just to get a feel for how it looks all together. There is only one area that needs tweaking, where I've altered the length of one bodice section and need to compensate on the skirt. You can see on the front that the lowest portion of the bodice is a bit puffy. Easy fix! I tried it on when I'd attached the skirt and couldn't believe how well it fits on only toile #2. I'll try a self-timer shot on me when the twins go to bed.


So that's whereI'm at. So very nearly there, with way fewer headaches than anticipated. I'm inclined to think that I've learned all I'm going to from the lining toiles, and since fabric choice is crucial it's not worth doing any further testing and tweaking till I know what I'm going to use. I have about 8m of a knit I got because if you bought the whole roll you got it for next to nothing. Curiosity might drive me to try a toile in that, just to see how it works. Who am I kidding? Expect toile #3 in a knit next!
I'm having so much fun with this project! I was browsing some of my historical reference books the other night, including this beautiful two volume set of drool inducing eye candy. And there in Vol II, p460 is my dress! In black silk. I wish they'd included a picture of the back, but at least it's a picture. Also I hit Google to see if I could get any help with the project and found this article from Threads written by Betty Kirke herself. She explains how she measured the garments to produce the patterns - fascinating!
And Sherry I had to laugh when you commented that you were suddenly bored with your project and wanted to spend an afternoon here - that was pretty much my reaction when I saw the wedding dress you posted - I'd love to spend an afternoon exploring your stuff! (And watching you do bound buttonholes. That'd be good too.)
Edited to add - Arrgh!!!! Blogger won't let me break up my text into paragraphs! Sorry, this is a massive chunk of unbroken text to read. What's their problem with spaces anyway?

Tuesday, August 3, 2010

Vionnet toile #1

And so it begins....

I made up just the top portion of the Vionnet dress to see how I'm going scale wise. It's cut on the correct (bias, naturally) grain, of lining. And when I tried to slip it onto my dummy it was immediately obvious that it wasn't going to fit. After ripping out the "side" seams I slipped it on and had a look.

You can just make out my stitching lines in white (I marked those with dressmakers carbon before I took the paper pattern pieces off). I didn't pin it terribly evenly so one side gapes more than the other.


It's close enough that I think my scaling is pretty close - it's just a tiny dress! It's also meant to be made from very drapey satin, which would make it looser than my lining.
So, my next problem is how and how much to scale up? My first thought is that with complex and unconventional seaming it would be easier to just enlarge the whole thing by using a larger scale than by any type of grading technique. The problem with that is that it'll make the bodice longer as well as wider, which obviously wouldn't work. So I'm going to do some measuring to see how much extra width I need and see if I can add that in without ruining the lines of the dress. I can sneak a bit in at CF and CB, the rest is going to take some careful thought. The skirt is so full that I feel I can ignore it at this point. It's also so simple that it can be easily adjusted to match anything I do to the bodice without compromising the cut. And Sherry, yes it is slashed at the CB to match the point of the bodice CB. Can't wait to see how that looks!

Monday, August 2, 2010

Up Next

So I went to the library yesterday, and whilst browsing the shelves I spotted the famous Vionnet book by Betty Kirke. I've wanted this book ever since I knew it existed, but as is always the way, cost is prohibitive. So to see it sitting on my library shelves seriously made my heart start to flutter! Sadly it had a "Not For Issue" sticker on the front cover, but it did not have a "Do Not Pick Three Garment Schematics To Photocopy" sticker, so I raced away to the photocopier and cleared out the change in my wallet, grateful that (most unusually) I had change in my wallet! I photocopied the sketch and pattern schematics for three designs, with plans to go back and have a proper look at the book when I don't have Georgia downstairs picking her own books and wondering what Mum's doing upstairs for so long!

I seem to be suffering a serious case of winter blahs this year and I've decided that a Vionnet dress is the perfect antidote. Even recreating the pattern presents all sorts of challenges. Just what my brain needs.

I remembered a post on Kathleen Fassanella's blog, Fashion Incubator, about the Kirke book and a Japanese companion book which is better for reproducing the patterns. So I knew before I even saw the Kirke book that there are likely to be some challenges turning the pattern schematics into patterns. For my own entertainment I'm going to blog this process, and maybe I'll learn something of use to others who want to do the same thing!

I'm going to start with this dress, pattern #14. Isn't it beautiful? I'll shorten the skirt and I'd like to make it from something I can wear as an every day summer dress, but I'll see where the pattern leads me.

First problem - there is no scale indicated to enlarge the pattterns. Crap. (I did know this beforehand) There are no landmarks such as "waist" helpfully marked to help gauge scale. I made a fairly educated guess that it was 1-10 scale, based on estimating where the waist would fall on the pattern, and working out that the back neck to waist measurement was about 4cm, and the measurement on a person is about 40cm. Very dodgy estimation, but I would guess that it would be a round number scale - not 1-12.34 for example. After I'd decided this I found a message board thread (which I didn't mark, annoyingly, so I can't find it again!) in which someone mentioned using a 1-10 scale for these patterns. She didn't say it hadn't worked, so I'm going to stick with it.

So now I needed to scale up with no grid. It was actually quite easy to transfer the schematics to a grid - I just traced them onto a 5mm grid torn from an old maths book. Then I took a large sheet of paper and folded it into a 5cm grid to get my 1-10 scale. I folded rather than drew because it was less prone to errors (as a pencil blunts the lead gets thicker, and further from the ruler etc etc). Also I then have my grid visible on both sides of the paper and I can rub things out without losing the grid.

Not my favourite method to reproduce something, but with great care and careful measuring (I think I used every measuring tool I own) I could recreate the pattern pieces.


Traced onto plain paper and with 2.5cm seam allowances added, here's the result of about 2 hours work today.

At this point I ground to a halt because my dummy and the fabric I'm going to try first are in the bedroom where the twins are napping. For my first toile I'm going to use lining because it's lightweight and I have a lot of it. I know it's not nearly drapey enough, but it should give me an idea of how it's going size wise. Tomorrow.....

Wednesday, July 21, 2010

Stuff I've been making

I've been busy making up some of my designs while I get up the nerve to open an Etsy shop. What if I do and no one even LOOKS at my stuff?! Self Confidence and Putting Myself Forward have never been my strong suits. Anyway, I really need to suck it up and just DO it!


In the meantime, I've made this:


And this:


And this, the dress from my last post:


And some nice bright stripes and printed batik, with pockets incorporated into the princess seams and stencilled jacks, just for fun. Like it wasn't a fun dress already.


And I added the shark to this shirt which has been returned from Miracle having sat there unsold for quite a while.


I used today's bright sunshine to get most of these photos taken, and since I did I was able to put off the last detail needed on this coat. Keyhole buttonholes. Making them on scraps of denim is one thing. Making them on a garment which I hope one day to sell is something else. Somebody (sorry I didn't respond then, I tend to get a little distracted) asked about using a buttonholer on zig zag machines. It's even better - it'll work on straight stitch machines! I guess these type of attachments were developed in the days when machines pretty much only did a straight stitch.


Right, the 16 year old has a half day and needs the computer so I'm out of excuses. Back to the machine......

Thursday, July 15, 2010

My creative space - an external all-in-one facing tutorial.

I'm visiting Kootoyoo's Creative Spaces again this week - so much fun to peek into everyone else's!

My creative space is full of stuff in various stages of completion, so I thought I'd take the opportunity to demonstrate my way of doing an all in one facing, expertly demonstrated by Sherry recently. Her method works for pretty much all applications, mine only when there is a centre front or back opening in your garment, and wide enough shoulder straps. I find it easier, so I thought I'd show it here in case anyone else might benefit!

As mentioned, the garment must have an opening in CF or CB. Begin by sewing the shoulder seams of garment and facing and press them open. Since my facing is going to be on the outside I've sewn the dress with wrong sides together and facing with right sides together. This means the seams will all be enclosed when the dress is finished.

(Apologies in advance for the rather over-exposed photos in this post - my desk is bathed in sunshine during the twins' nap time!)

Then sew the facing to the garment around the neckline and armholes. If you're inserting a zip, leave about 3cm unsewn at the CB edge. I'm not so I sewed it right to the edge. Most importantly, leave about 3cm unsewn at the armhole edges.


Clip the curves so they'll turn evenly. I always offset my clips so that where the "Vs" form by opening out a curve they aren't in the same place on garment and facing seam allwances. This makes for a smoother edge.


Then turn the garment right side out by pulling the backs through the shoulders.


At this point I pin and edgestitch my neckline because it's easier when it's flat and the way my CB opening is finished won't be affected by it being done now.


Next sew the side seams of garment and facing, and press them open.


Then finish sewing the facing to the garment around the bit of armhole left unsewn, and finish clipping the curves.


After edgestitching the armholes, it looks like this.


Last of all the seam allowance on the lower edge of the facing is pinned and stitched down. After one final press, here it is.


I really like these external facings on dresses I make for children since they give a lovely smooth finish inside, and a nice lift to a plain design.

Sunday, July 11, 2010

Why My Blogging Is Somewhat Erratic At Times

This is Nicholas's favourite position from which to watch Timmy Time while I try to drink my first cup of coffee for the day and catch up on blog reading. Usually he has a handful of my hair too. (Yes I know I should have brushed it. It's Saturday and I wasn't going anywhere so I was slack!)

Thursday, July 8, 2010

My Creative Space - Um, Bandwagon, room for one more?

I thought I'd join in with Kootooyoo's Creative Spaces this week because I just couldn't resist jumping on the man's shirt to toddler dress refashion bandwagon. (One of my personal favourites on this theme was the hilarious "How to turn a toddler's dress into a man's shirt" posted on April 1st. annoyingly I can't now find it, and Google isn't helping)

So here's my version, for which I won't provide a tutorial because there are about 70,000 results from Google if you look. Besides which I don't do the "lay a dress which fits your toddler on top of the dress and cut around it" style of sewing. I'm a pattern maker. Not a proper one (a patternmaker, with no space between the words), but I learnt the principles as part of my degree and continue to learn all I can from books and the internet (check out Sherry's blog for some brilliant tutorials). I drafted a pattern for an A line dress in a size three (so it should fit Isabella better this summer, when she'll be over 2 and a half) and made this.

I'd started with this. David doesn't wear short sleeved shirts, so when his brother was having a clean out I swiped it.


To maximize available fabric I unpicked the (flat-felled) side seams.

And squeezed my pattern pieces on. I had to unpick a bit of the armhole seam as well to get it to fit.


Here's a reminder of how I manage my turn of cloth allowance for collars. Sherry shows how to do it properly at the pattern stage. I've folded the collar and pinned the lower edge and now I'm sewing within the seam allowance to secure it before attaching it to the neckline. You can just see how the underneath layer is peeking out.


Also on my desk today are these trees, freezer paper stencilled. I really really really love silhouettes of bare trees.

And my friends have been giving me stick for not mentioning my dress. I wore it out to dinner for one friend's birthday last weekend. Where it was much admired and I felt a million bucks. (I even ran into my BIL who told me I looked fantastic.) I realised that it wasn't the dress that left me feeling Meh, it was the grey and dismal winter we've been having! So Keely, J, M, H and other J, there you go. I mentioned it.

Tuesday, June 29, 2010

And it's done.

Well, I finished my dress. Here it is. Front:

Back:

It fits well and looks just how I envisioned, but it leaves me feeling sort of "meh". The fact that I look so sour in these photos really doesn't help! I used the timer instead of getting David to take them because he isn't coming home for lunch today and by the time he gets home after work the light will be too gloomy. Perhaps it'd be a happier dress if I was wearing it out to dinner instead of quickly putting it on for a couple of photos before getting back into warmer clothes!

Saturday, June 19, 2010

Yeah I can crochet!

After my eight questions yesterday I wondered if I still had any of my early crochet efforts. I know that somewhere I should still have the round pineapple pattern doily?tablemat? I made 20 odd years ago but it might take a bit of searching to find! I did however find this piece of filet crochet which I am fairly sure is at least 20 years old. It is rather stained and I had a horrible feeling that I had washed it before putting it away, and after washing it again and not even slightly shifting the stain I'm pretty sure that this was the piece that was sitting on a stained wooden coffee table which got water spilled on it. I think the stain is wood stain which leached out of the wood. Oh well, I can always dye it!


And when I came back into the room after photographing this I was met by this sight.

It's blurry, but you can make out in Nicholas's right hand an empty overlocker thread cone, and on the floor in front of him the white thread which he has pulled off the cone. Sigh.

Friday, June 18, 2010

I guess I'm it

I've been tagged by Sherry of Pattern Scissors Cloth in a game of eight questions. I'm telling you now, if you've never read her blog, go now. This lady is a real live designer and patternmaker - her tutorials are BRILLIANT - really easy to follow and she covers all sorts of really interesting topics. I love me an expert and boy do I appreciate one who is so willing to share her expertise. anyway, enough gushing, on to the eight questions.


1, Which pattern/vintage style have you been thinking about lately?
Easy, I've been stewing over The One That Got Away. I spotted this Christian Dior evening dress pattern on Trademe last week, popped it on my watchlist and FORGOT ABOUT IT. I missed the end of the auction, where it failed to garner any bids. It could have been mine for $8. (Insert mental picture of my anguished wailing and wringing of hands right about here) It's been relisted and bidding currently stands at $10.50. I'm reluctant to spend too much on a pattern, no matter how intriguing, if I'm not sure I'll ever make it. I'll see what happens to this one, but boy am I annoyed that I forgot it! And yeah I know I could draft it. It may come to that. I tend to get "focussed".


2, What's the one place you want to visit that you've never been to before?
Again, easy. England. Not very precise destination I know! My Mum is English, as is my Dad's father, and I'd love to see where I come from. And while I'm there, the V and A beckons, as do one or twelve other museums......


3, How do you relax?
Relax? What's that again? Like many sewers, I sew to relax. I'm not sure whether it makes me strange that I find tedious, never to be seen handstitching (like the catchstitched seam allowances in my last post) restful. Other than slow, meticulous needlework, I go to the gym. It's my "me" time - All About Me. I feel better for the physical activity, I look better because of it, and that also makes me feel better, so it's an important part of my week.


4, What is your favourite holiday?
About 10 years ago David and I spent a few days in Fiordland. It is the only time we have ever been away by ourselves (we got together when I was a single Mum with a one year old). We drove Cayden to Wanaka to spend a few days with my parents at Glendhu Bay, then went on to Te Anau. We did a number of fun things while we were there, the best of which was an overnight cruise on the Milford Wanderer. I got my G&T on deck at sunset, but heavy cloud cover (hey, this IS Fiordland!) meant it was less than spectacular. As our only time away alone, it's a pretty special memory.


5, What is one sewing skill you want to learn/try out?
Where to start on this one? There are many, many things I want to try, but one I've thought of consistently is proper full-on tailoring. Oh, and a whole lot more about patternmaking than I know now.


6, Can you knit? Crochet? Other crafting talents?
Yes I can knit well. I like cables, lace patterns, tricky stuff. I love the look of stocking stitch but knitting it gets boring pretty fast. I really fancy the socks Sherry showed on her blog.....
I can crochet, but it's not something I've done much of, and I can't follow a pattern without a how-to in front of me to remind me what is a double crochet, treble crochet etc. I've also done a bit of cross stitch and very basic embroidery. I can't draw to save myself.


7, What garment/accessory do you wear the most?
Baring my soul, it's this cardy at the moment. (NB, this is the first time I've used the timer on my camera - all it took was a tissue box on the table and voila! Apart from the cartoon-esque glint off my front teeth I don't even hate this! Should have brushed my hair, but I'm not going anywhere today.....)

I made it when I was pregnant with the twins (lets face it, there was no way much else was going to cover me!) And I lived in it for the latter part of my pregnancy and all through the winter after I had them. It was great to snuggle a baby under while breastfeeding. I'm embarrassed to admit that the next winter and the next (this one) out it came again, and I wear it pretty much every day it isn't in the wash. The sleeves are too short (hey, I was pregnant, I thought I did well to grade and slightly alter a pattern that started at a size 44 [Burda WOF] when I needed a 36. I can't be expected to remember that I have long arms too.) The fabric is cheap synthetic, so it looks pretty dingy now, but at least it dries quickly after washing. It also hangs quite a way away from the front of my body worn loose like this (I had, um, quite a lot more front when I made it) so it does my figure no favours. You'd think I would have enough pride/class that I wouldn't wear it out of the house,but I do. Under a coat, but it gets out!

8, How much time do you spend reading blogs? (Per day or per week?)

Um, that varies quite a bit. If my sewing is frustrating me or just not inspiring me it can be quite a lot of the twins' daily three hour nap time. (Yep, just turned two and they nap for three hours. I'm not about to mess with that!) Usually about an hour or two a day. I can't help it that there are just so many clever people out there who blog!

And I'm choosing to answer 8b as well.

8b, your motto/mantra?
I have two. The first has been my signature line on Patternreview for all the years I've been a member. "There are no sewing mistakes, only opportunities for design features" It's been much commented on over the years, so I think I've struck a chord with a lot of people!

The other is our house rule - "Be nice or be quiet" Exactly the same sentiment as "If you can't say something nice..." etc, but it has an air of parental command about it! An implied "or else!" attitude that kids sometimes need. One day I want to make a wall hanging of this.

Now who to tag?

Keely of Keelysews who is my BFF in real life. Despite this I don't know her answers to these questions!

Kristine of Beangirl, who is just funny and clever and worth visiting just for the giggle even if she didn't sew.

Kathryn of Les Petits Anglais because I'd just like to know more about you!

Katie at Kaddidlehopper because she leaves such nice comments and makes such cute stuff.

Gail at My Fabrication because she makes beautiful clothes from beautiful fabrics that I love to look at.

And I'm going to leave it at that because some others I would have tagged have already been by others. My apologies if I've doubled up! I'd love to learn more about everyone. It's nosy, but so interesting!

Thursday, June 17, 2010

My Creative Space - dress interrupted

I'm playing along with Kootoyoo's Creative Spaces this week.


As much as I want to finish my dress, it's taking a backseat this week so I can make a top for a dear friend to whom I owe sewing in return for babysitting during the school holidays before I had the twins. Um, yeah, she's patient! (actually she waits till she wants something then cashes in a favour). Even if I didn't owe her sewing I'd want to do it because she's a) lovely, and b) a real pay-it-forward kind of person. She truly deserves a bit of pretty coming her way. Anyway, she's just undergone surgery and (as you do) needs a pretty new top. This is one that we copied for her from a RTW top a couple of years ago. By "we" I mean "me-while-she-sat-beside-me-saying-"uh huh"-at-relevant-points-and-feeding-me-Pinky-bars." I got started on it yesterday and quickly decided that it needed to be prettified. J and I have very similar taste so I am a little more confident that she will like something I like than other friends would.


My first idea was to do a very simple applique using a running stitch around a stencil design then cutting away the excess fabric, a technique very similar to what I've done on my children's designs with an influence from the utterly stunning work of Natalie Chanin (if you've never heard of her, go and check out Alabama Chanin). After I'd done the first one I was not convinced. Here's the best photo I could get of the front of the top with one applique done and two others pinned in place.

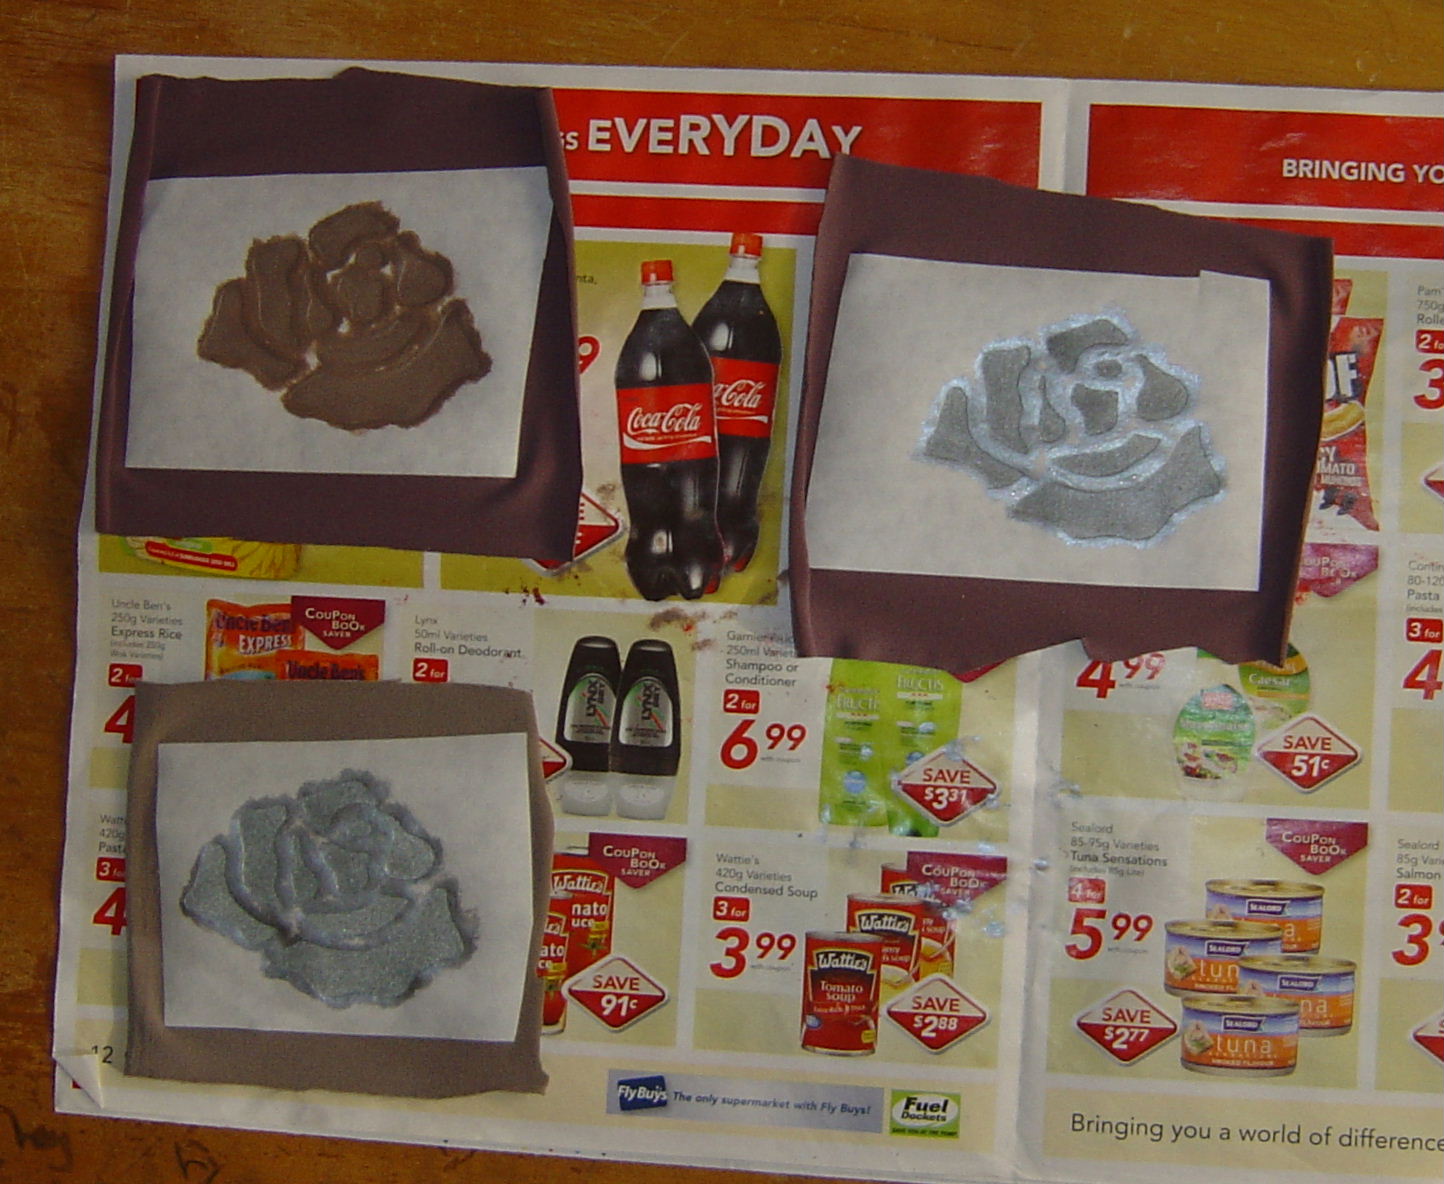
I just wasn't feeling it, so I decided to paint a couple and see if they look better. Since they're on scraps of fabric there's no risk of wrecking J's top if it doesn't work or she doesn't like it. Two silver and one burnt umber, on two different coloured fabrics. Now to watch the paint dry......


.......and they'll look a little like this. Once the paint is properly dry and heat set I'll figure out how best to attach them to the top. I'm thinking of going back to the running stitch (with toning but slightly contrasting thread) and trim method.


And just to finish I thought I'd show what happens when you forget to cover (or lower, if that's an option) the feed dogs on your sewing machine as stated in the instructions before using your new favourite toy, the Greist buttonholer. I was trying to go around each buttonhole twice and the second one wasn't lining up with the first. After four keyholes and one short buttonhole (and several heart palpitations) I realised my mistake and covered the feed dogs. After which I got a beautiful short buttonhole and the most Perfect Keyhole Ever. I am so in love with this. I need to make myself a(nother) coat just so I can USE it!


And many thanks to Katie, who had the great, simple (and blindingly obvious to anyone other than me) idea of starting the buttonhole at a point other than the top with my other buttonholer - worked a treat!

Monday, June 14, 2010

Dress progress

Being pretty much incapable of just following instructions from the beginning and methodically working my way through to the end, I've completed the front and back of my dress before doing the much-less-interesting underdress (aka, lining). I couldn't wait to see how this was going to look! And it looks pretty much like this - a bit saggier than it should look on me as I am very slightly better endowed than my dummy and it's just pinned hastily together and unsupported by the underdress.
Front:

Back:
I'm really pleased with how all the sections came together and how nicely the skirt hangs - I was a bit worried that it would stick out stiffly. It wrinkles very readily, so I'm leaving it pinned to the dummy as much as possible. Even so I can see that it looks like I need to have at it with the iron again over the long skirt seams.


Once I'd got this far I couldn't avoid the underdress any longer. Well I could have, but it makes sense to have the foundation complete before determining any alterations to the side seams. The instructions have you fuse interfacing to all the bodice bits but I didn't have any nice knit interfacing around and no way was I fusing cardboard to this! So I opted to use lining as an underlining. It gives nice body to the bodice without compromising flexibility.

Hand basting all the bodice sections takes a while, but it's mindless work and rather restful. What does it say about me that I find this sort of task relaxing? Anyway, here's my finished pile of bodice sections, done while I watched Star Trek IV on tv.
I like the red underlining. It'll be totally hidden once the dress is finished of course but it was way more fun to sew than a dull colour!

Once they were all done I had fun fitting the bodice. On the dummy it's easy, but then I have to try it on me. I got sick of contorting myself trying to hold the sideseam closed and assess the fit and got David to pin it for me. He's willing and deft, but not used to pinning! Eventually we got there and I was able to determine that I did need to take it in under the bust but not much else. Once the seams were sewn, pressed, trimmed, notched and hand catchstitched (yes, hand catchstitched. Relaxing!) to the underlining it looks like this:
And that's it for today folks. The twins are snuggled in their cots for a nap and I am way too tired to do anything which requires me to think, thanks to a certain someone who shall remain nameless (but who's name begins with N and ends with icholas) who woke at 11pm and then at least once per hour, usually 3 or 4 times till 4.30am for no apparent reason. He wasn't fussing so I don't think it's teeth - he just wanted to sit up and take off his sleeping bag, and if I wasn't quick enough, his pyjamas too. Delightful.
Edited to add - the day has been saved from the blahs by the arrival of the post - containing my other Greist buttonholer! And it WORKS! Really really well! Oh happy happy me!!!!!

Thursday, June 10, 2010

It's alive!!!!

Well, it's working at least! My long-wished-for Gresist buttonholer, far from being in "good working condition", required two overnight spa treatments marinating in CRC and more than two hours over two days to clean off the old toffee-like grease with cotton buds (q-tips), rags and toothpicks (they turned out to be the best cleaning tools). After which I held my breath and fitted it to my machine and almost closed my eyes as I pressed the pedal.....


......and round she went! My first attempt is the straight one at the top of the pic below. It skipped a few stitches, including one big chunk on it's first round, but I just went around again and covered it better and after that it didn't skip any more stitches. Then I put in the keyhole template (which is what I wanted all along) and made two of those - each of the ones below has been stitched around twice and I think they look lovely. I am puzzled though by the odd extra bit at the top of each one - when I went around the second time I got the lovely rounded top and I can't figure why it starts like this. It's easy to pick out those couple of stitches, but I'm totally baffled as to why it does this. Apart from those few stitches the second round was exactly on top of the first.

As I showed them to David when he came for lunch I commented that it seems a bit weird that just a few stitches on a scrap of fabric can give me so much pleasure. He totally understands. Which may be why I married him ;-)

And in other news, I have now stencilled one panel of my Vogue dress. The design came from a beautiful book of William Morris designs for applique. Applique designs frequently lend themselves really well to stencilling, and I love these!

This panel is the front (believe it or not). The stencilled design will go from left shoulder down to right side.


The colours aren't great in this photo - dodgy light and basic camera. The red is more of a blood-red than the bright red ink (due to the grey base fabric) and the silver is metallic. On some angles, in some lights, the silver fades out of sight. I love how the design differs depending on your view. If I wanted the the colour to be less influenced by the base fabric I'd need at least one more coat, but this is exactly what I wanted so I stopped at two.

Tuesday, June 8, 2010

Bugger!

Humph. The end of the sentence I left hanging was .....reist buttonholers. I stumbled across not one but TWO on Trademe by the sneaky technique of trying Google instead of looking through the Tradme listings for machine accessories under sewing. For some reason both were listed under antiques and collectibles, and I was the only bidder for each! (Another case of bewilderment that I'm not fighting off other bidders with big sticks). I got them both, and the first arrived today. I paid $30 (plus postage) for it and it was described as being "in good working condition". I was very hopeful, but have enough cynicism to be a little wary of such a claim not backed up with "when I tried it this morning". I put it on my machine and gingerly pressed the foot pedal. The needle went up and down and the buttonholer did nothing. I said a few colourful words and took off the case to have a look inside. There is a thick treacly coating of very old lubricant preventing certain parts from moving freely. As I type it is sitting in David's shed having been carefully sprayed with CRC, which should remove the gunk so I can re-oil it and hope that this time it will work. The instruction manual suggests lubricating with petrolum jelly once a year. I think I now know what 20 year old vaseline looks like. There is no other indication that anything is broken or wrong with it and I suspect that the seller did not wilfully mislead me, but took his mother's word that it worked perfectly when she last used it - at a guess 20 years ago. I will send him a polite email, but I see no need to be too annoyed. I may be more annoyed when my second one arrives (end of the week probably) for which I paid the grand total of $5 plus postage, and about which no claims of being in working order were made. It appeared to be in extremely good condition and may well be in good working condition. If I paid $30 for a non-working buttonholer and $5 for a working one I may not be overly impressed. If it doesn't work either I'll probably take them both to my (retired-engineer-and-all-round-very-clever-bloke) Dad to see if he can make one of them go. David probably could too, but Dad has more tools.....


Just to give you something cute to look at after that long-winded grumble, here's Isabella modelling her new dress. I wish I'd taken her cardigan off so the dress isn't obscured, but you get the idea. If I'm very lucky I get three shots before she loses interest and wanders off. (And just for the record, I'm really glad I did go over All That Topstitching. And even more glad that it actually makes a difference.) She has a real thing for shoes - she is constantly wandering around in any pair she can get her feet into!