Wednesday, January 16, 2013

I'm baaaack....

Well it seems like a while since I was here, and I had a very prolific December sewing wise.  However after a fantastic holiday at Lake Rotoiti (in the Nelson Lakes district) for a family reunion (which included a visit to the World Of Wearable Art museum in Nelson, which was fantastic!) we returned home to a dead computer.  Blue screen of death, etc etc.  Fortunately we have a couple of IT experts in the family, and while one lot were (and still are) rescuing the un-backed-up (YES I KNOW!) contents of our old one (three or so years of photos most importantly) my SIL was able to procure a machine for us, due to be recycled, hence free!  While not the latest and flashest, it is a decent step up from our old one, and got us back online. We're currently working out how to use windows 8, which those of our acquaintance who do programming and such Do Not Like.  Since none of us do, we're quite happy with it.

The only annoyances for me are that it does not have spider solitaire on it, and our camera software is not compatible, meaning I have to get something else to edit photos.  Since mostly I just crop and rotate them that isn't a big deal, and I did these in Paint!

Right, onto a small sampling of what I've been sewing!


This dress is for the daughter of a friend of my dear friend J.  She gave me this fabric, which was big enough for two dresses - one for Isabella, and one for F.  In exchange for F's dress, I get the rest for Isabella.
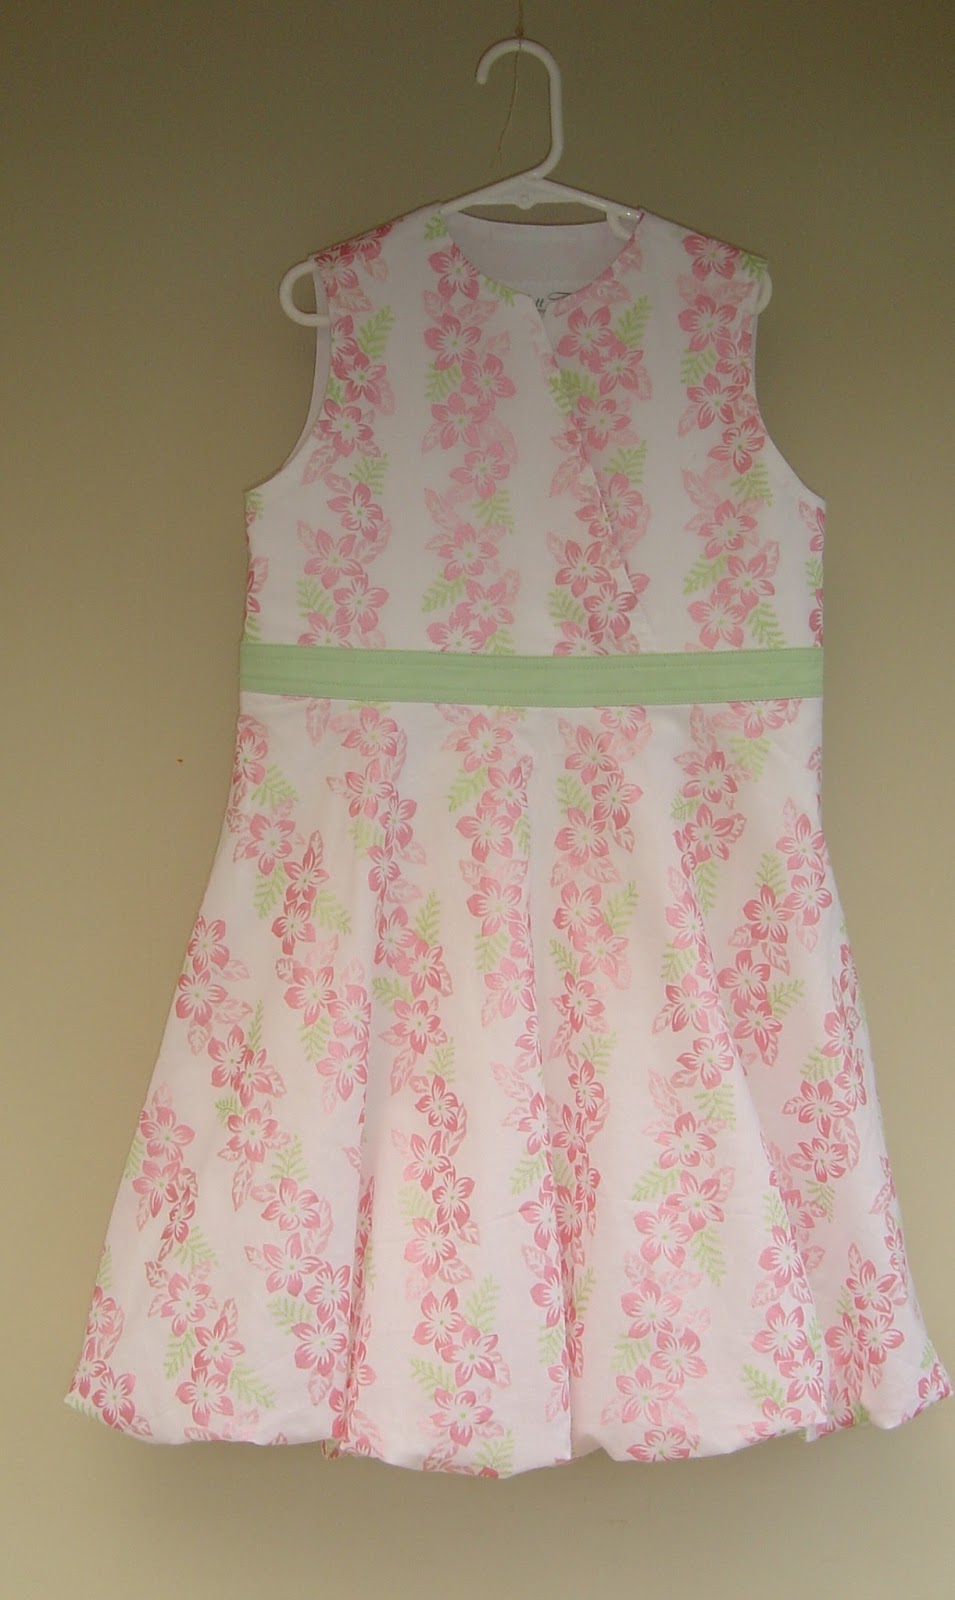

Isabella is remarkably willing to model a dress which isn't for her.  This is a size 122 drafted from Aldrich.
Isabella is around 110cm tall, so this fits much as I expected, although it isn't as long as I would expect.


This dress IS for her.  She was very very willing to model it for me and this ended up being the best shot.  Given camera/computer dramas I'm not enthusiastic about another photo shoot.  It's the first thing I've made from one of the Enid Gilchrist books I received from a lovely reader quite a while ago.  I absolutely loved the books, and had plans for several things - either garments or details, but life seemed to get in the way rather a lot.  This is described as a school dress, and I assume is what school uniforms looked like in Australia in the 60s.  It's a size 6, which is great on my tall 4 1/2 year old.  The dots are stenciled on with freezer paper.


For myself I made this top from Pattern Magic 2.  It's called flip turn because of the way one of the pieces flips over the other to create the drape effect.  The drafting was pretty straight forward, and since I'd toiled the block when I first got the books I didn't have to start by doing that.  This is my second version.  After making my first (which I also wear happily) I skimmed in the sides and added a couple of cm to the length.  I've seen other peoples versions of this which are a snugger fit, and I'm thinking I might sneak a little more width off the front, which is wider than the back.


(I know cropped pants are not the most flattering look, but they are very comfy when you don't know whether the weather will be hot or cold.)

And last of all, this shrug.  It's McCalls 5398, now OOP.  This was another garment courtesy of J - I made one for her and one for me from a piece of fabric of hers. We've joked for a while that we're twins separated at birth because of our similarity of taste, and we now have several matching garments.  We'll have totally matching wardrobes before long.

I love shrugs - just enough warmth when it gets chilly, and they don't cover up the details on a pretty dress or top.


So there you go, a brief look at what I've been up to.  When kids return to school and kindy and I have a better idea of what I am doing computer wise I should be able to do a little better with photos.  The mojo seems to be in full swing, so there might even be some MORE SEWING!

Saturday, December 15, 2012

How a 13 year old should dress.

Georgia is 13. (Scary thought).  Last Thursday her school held their year 8 social.  Naturally this required dressing up.  She wanted a mullet skirt, but to my eternal relief, not as short as the thigh high hemlines of the skirts in Supre.  She wanted to spend her birthday Spotlight voucher on fabric for her awesome Mum (her words, I swear!) to make one to her specifications.  We bought her new (flat) shoes, she borrowed a top from me and added a cardy she's had for ages, onto which she sewed purple buttons some time ago.  I put her hair into hot rollers for the occasion, and she painted her nails.  And that's it.  This is the only photo of her, (taken by her friend with an ipod or something) as I forgot to take one in the rush to get to the social!


I loved how she looked - like a 13 year old girl, not like a 20 year old hooker.  Most of the girls had new dresses, many a lot shorter than I would have liked Georgia to wear!  I wonder how long she and I will see eye to eye on appropriate clothing?  She LOVES the skirt, and was so thrilled to have me make her something exactly as she wanted.  It didn't hurt that some girls in her class came up to her and said how much they loved her skirt and said it didn't look like the ones in the shops (better), and where did she get it, and how lucky she is to have a Mum to make it.

As an aside, it felt very very different to be making her a pretty skirt to wear to a social - I've made plenty of things for her for special occasions, and plenty of dresses for other girls to wear to school dances, but it really hammered home that my little girl won't be for much longer.

I think this post is to mark a moment for me, in case my lovely Georgia turns into a horrible teenager who only wants label clothes approved by her peers, and sneers at the things I make her, and would rather have a trashy piece of (bought) rubbish for her formal than something her Mum made.

Wednesday, December 5, 2012

The least alike twins in the world

 I made this dress for Isabella. (BWOF 01/09, #136b) It's one I threw aside in disgust a little while ago when I realised that as drafted it wouldn't go over her head.  Thanks Burda. I ended up drafting the original strap arrangement into actual straps that cross over at the back.  Fortunately I had plenty of fabric to cut them.


I made her a size 110.  She's recently been measured at 108cm tall, and as you can see, this barely hits her knee!  She is in the 75th percentile for height, and about 90th for weight, so sewing for her requires a little thought in the exact opposite direction from Nicholas!

Red and white gingham, fresh and pretty, and festive to boot.  She put the santa hat on, and willingly did a little dance for me to photograph.


I should have shown a picture of them together to really show the size disparity, but anyway here's Nicholas, also today.  Cute outfit isn't it?  His shorts are size 3-6months baby jeans, (bought for 50c from the kindy fair - bargain!) and his T shirt is a size 1.


Their personalities are also as different as can be. When I first found out I was having fraternal twins I thought it would be nice if they were different sexes so that they didn't necessarily go through their whole lives identified as "the twins" if they didn't want to.  I sure got what I wished for :-)

Monday, October 29, 2012

Home Sewn, the book

In response to interest shown, here is a peek at the book I mentioned in my last post, Home Sewn.


The ten designers who contributed patterns are listed on the back.


The book begins with 12 pages outlining the history of home sewing in New Zealand.  Who sewed and why they did it, along with examples from several.  As one with a keen interest in the history and evolution of dress, this fascinates me. (I mean "dress" in its broadest sense, encompassing all body modifications - everything a person does that alters their body from its natural state.  That includes the temporary, such as hair styling and make up, as well as the permanent, such as tattooing and scarification.  Hmm, does it show that I really really enjoyed my Social Psychology of Clothing lectures?)  Twelve pages is not a comprehensive account, but it gives a very good outline of how things were in New Zealand and how that affected the desire or need to sew for oneself.


Then come the patterns, each with a brief profile of the designer.  This is Cybele Wiren's profile and design.
(As an aside, I have finished my dress, but I am not going to photograph it until I have made a nice wide obi-style belt to wear with it.)


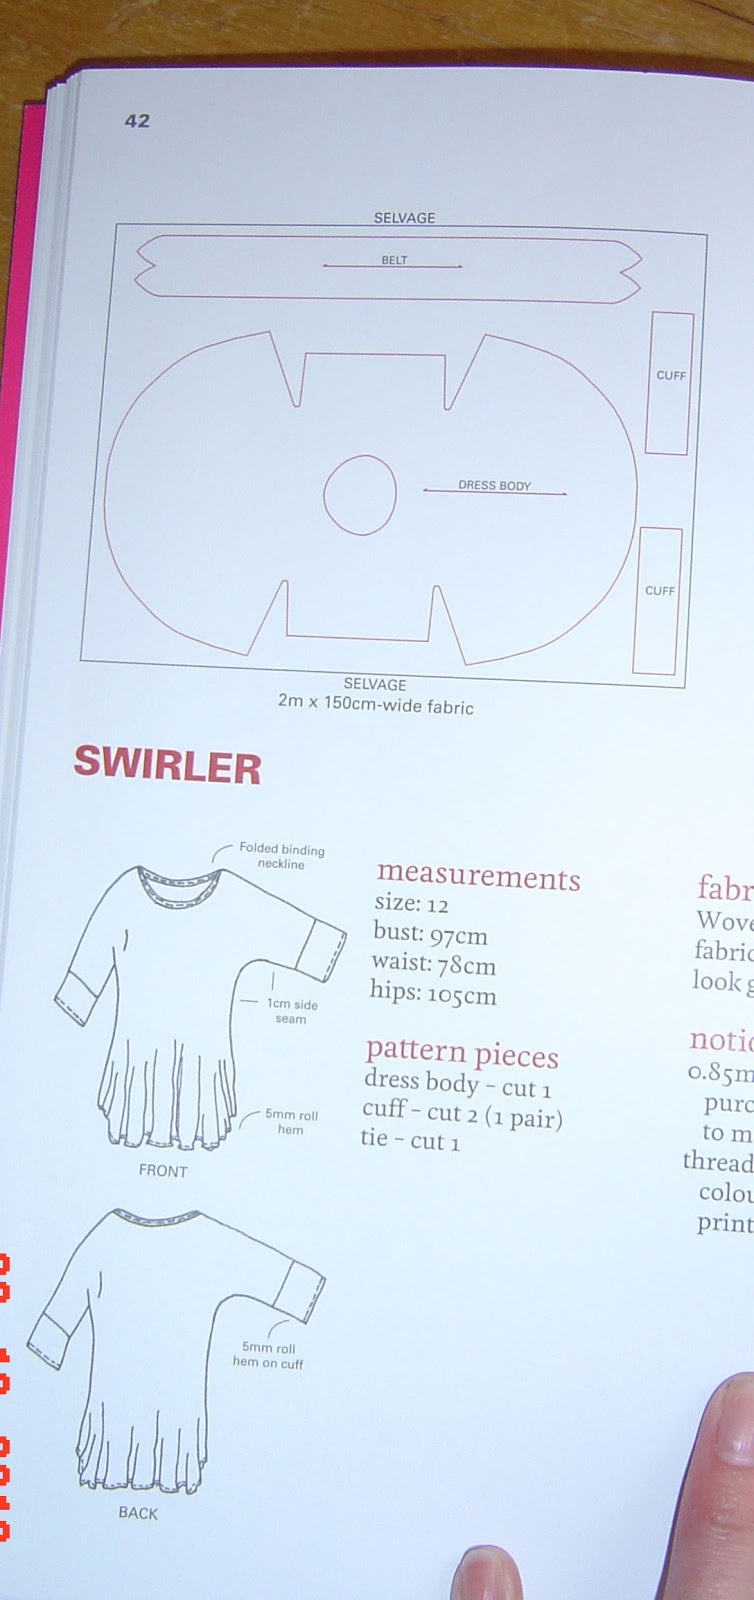
This skirt, from Papercut Patterns, is also available for sale here.  Katie Brown, the designer of Papercut, is also responsible for developing the patterns, lay plans and tutorials in the book.  The book is also available for sale on the Papercut website, here.


This versatile dress from Starfish is another one which caught my eye.  It can be worn like this:


Or one of these ways.  My apologies for the really crappy photos.  I gave up in the end trying to get anything better.

I was really attracted to the line drawing of the main pattern piece.  This will be made just as soon as the appropriate fabric presents itself.


As will this striped skirt by Vaughan Geeson.  Those stripes are pieced. And curved.  Can't wait!


At the back are several photo tutorials covering techniques used in the book.


Patterns are printed on pattern sheets, with each pattern in a different colour.  I did find while tracing my dress that the two very similar pieces were so close together that I had to keep checking that I didn't veer off into the other piece as I traced.  Not a big deal, but it did require care.  Some patterns are multisized, but most are given in a single size - NZ10, 12 or medium, so you either need to fit that size or know how to grade.


The only thing that has so far caught my eye as an inconsistency is the difference between the photo of the T shirt from World:

And the line drawing.
I tried a dozen times to get better photos than these but this was the best I could do.  It appears to me that the T shirt in the photo has attached sleeves, which would give a closer fit than the cut on sleeves of the pattern.  I don't THINK I'm wrong about the seam, but its always possible!

Those paying attention will have noticed that the pattern lays are for a single layer - yay!  Most of the patterns appear to be given as full pieces as well, rather than half patterns to be cut on the fold.  (I haven't checked all of them, but the two I have traced are full pieces, as is everything else I've noticed.  The exception seems to be the Swirler (multi-wear) dress by Starfish, which is given as a half pattern, probably because its pretty big.  The pattern lay is single layer though.)

As I mentioned in my last post, instructions are minimal, making some of the designs challenging for beginners to sew.  But what fun to have my own Cybele dress for the princely sum of NZ$15 for the pattern (based on NZ$45 for the book, used for three patterns, therefore $15 each) and $3 for the fabric.  I love this book, and I love that this book has been written, and I am grateful that ten New Zealand designers each contributed a pattern to celebrate the long history of home sewing, and to help keep it going.

Wednesday, October 24, 2012

An Embarrassment of WIPs

That should be a collective noun.  I recently made a dress for my friend J, and while she was visiting for "fittings" (which involved a fair bit of coffee drinking and Pinterest surfing as well as actual fitting) she mentioned wanting a jacket.  So I showed her a pattern I thought she'd like (#118 from BWOF 06/06, which is old enough that it no longer appears in the magazine archive) and shamefacedly confessed that I'd started it (in fabric she'd like) when the magazine came out.  I think I abandoned it because I wasn't sure about trim, but it may have been because I realised that the sew-in interfacing I'd chosen to underline it with was the wrong choice.  This is a light, loosely woven fabric which frays when you look at it.  A fusible knit interfacing would have been much better. So I did more work on it anyway before reaching the same trim dilemma, and I am seriously contemplating carefully unpicking everything and using fusible interfacing to underline.

Moving on, at the same time I dug out the jacket I came across the cut out pieces of this handbag.  (It's the Nairobi bag which was a free download from Hotpatterns several years ago).  My current handbag is from the same pattern and is looking pretty sad.  So (also an embarrassingly long time ago) I cut this one from curtain fabric.  It stalled because I needed to get appropriate interfacing.  This is J's and my signature favourite colour, and she LOVES butterflies, so this languishing in a box almost brought her to violence!

And of course the ongoing Alabama Chanin skirt.  Mostly getting worked on at craft nights.


This is a dress I started for Isabella.  Also a BWOF pattern (#136B from 01/09).  I bought this magazine when she was less than a year old and had to wait for her to grow into it.  And then another year or so to get around to it.  I finally started a couple of weeks ago and when I got to this point I thought I should check the (suspiciously small looking) neck opening would fit over her head.
We know where this is headed, don't we?  Not even close.  Opening was about 48cm, her head was about 54cm.  Dress tossed aside in disgust as I ponder how best to make the opening big enough without losing the look of the back section, which I like.  Fortunately I have plenty of fabric to recut any of the pieces I need.


And last but by no means least (is anyone still reading?) the current genuine Work In Progress.  It's been waiting a few weeks because I needed plenty of space for the pieces.  Two of them, which each take up most of my dining table. (My sewing for me time has been severely curtailed of late by curtains, school holidays and the mammoth task of relocating all the kids to different bedrooms)

Any guesses as to what this might be?  I LOVE patterns which are impossible to figure out at a glance!  This is going to be a dress.  This dress:

Back
It's one of ten patterns in this book "Home Sewn", which is a celebration of the history of home sewing in New Zealand.  It gives a brief history of the subject, and the patterns, along with a short interview with each designer.  It appeals to me on so many levels!  One of which is as a future historical reference.  It's a snapshot of now, albeit brief, and it is specifically about New Zealand - YAY for local history!  The book is for sale at Papercut Patterns. I got mine from Global Fabrics in Dunedin.

This dress (the first of at least three projects I am planning to make) is by Cybele Wirren.  (See her website here).  I'm going to make a wide obi or corset style belt to wear with it.  One side the same fabric as the dress, the other something funky.

The patterns are really interesting - as far as I can tell, they are more like industry style patterns, with varying seam allowances, and notches marking them.  They're all printed on large pattern sheets, like magazine patterns, with each design in a different colour.  My only quibble is that the two pattern pieces for this dress are very similar, and were printed so close to on top of each other that I had to check several times that I didn't mix them up.  Minor quibble!  Instructions are concise and clear, but brief.  This is all you get, so not for beginners.  Hugely fascinating for those with a little experience!


So there you go, yet another blog post proving that I have a short attention span and a constant need to get on with the next thing, sometimes well before finishing the last thing.  Oh yes, and I've also decided that it's time I made myself a corset, you know, because.  I have Norah Waugh's Corsets and Crinolines out of the library and my pattern from it enlarged and ready to start playing with.  I got spiral steel boning from the States *ahem* several years ago.

Tuesday, September 4, 2012

Three shades of grey.

First there was this:

Then there was this:

And now this:

(Click any pic for a bigger view)
Seriously folks - how many grey dresses does one woman need?  Clearly, several.  Grey is my preferred neutral, and very versatile, so I consider it a great choice for dresses.  (And pretty much every other type of garment as well.)

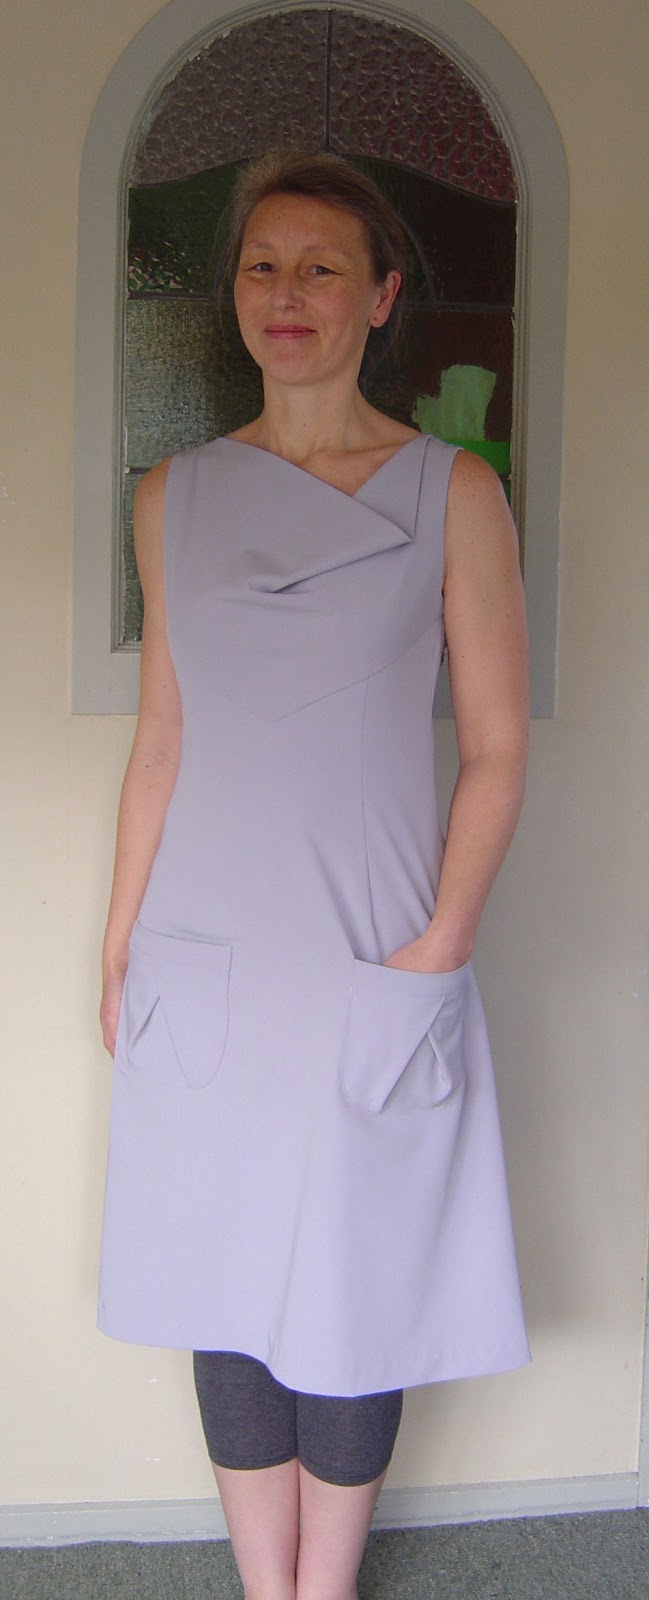
This dress is made from one of the bridal patterns in Burda Style 03/12 (#104, available on the BurdaStyle website here.)  The previous grey dress was another bridal dress from the same issue!  I have long been using formalwear patterns for every day clothes, usually with few alterations other than to length and fabric selection.  For this dress that meant:

*Choosing a stretch woven with a matte appearance rather than lustrous silk.

*Shortening it.

*Adding the separate bodice panels back onto the skirt in the front, as that pointed waist seam did look a bit too bridal to me.  Fortunately that was a simple matter of tracing the skirt pattern, then lining up each bodice panel along the seam to trace before adding seam allowances.  The back waist seam has quite a bit of shaping in it, so to do the same for the back would have meant considerable manipulation of darts, which I didn't think was going to make any improvement to fit or appearance, so I happily left it.

*Adding more flare to the skirt.  I'm pretty hippy (ie, have a big bum) and A line skirts tend to suit me better than straight ones.  That was a simple matter of extending the side seam line from the hip in a straight line.

*And of course, pockets!  I like pockets!  These ones came from another Burda Style magazine, 03/09, #114 (which is a coat).  I like the way the folds echo the cowl.  Incidentally, I like the way a cowl in a woven fabric folds like this.  My wedding dress had the same thing.

*Since my dress is unlined I made a facing for the back neckline and armhole, but of course didn't think about how it would line up with the cowl section which forms the uppermost portion of the side seam of the front.  Doh!  So inside it looks like this:


On the other hand, I am pretty impressed that this is how my dart matching and zip alignment worked out along the back waist seam - on my first attempt! (Yes, I basted a couple of centimetres either side of the seam when attaching the second side of the zip.)


Laters, Baby.

Sunday, August 26, 2012

Styling The Dress

Ok, so this is how I wore it on Friday.  Turned out there were no cameras clicking so my efforts in styling my hair were wasted!  Today however is a GLORIOUS taste of the spring which is now mere days away, so I dressed up and headed outside with the tripod and self timer.  I feel like such a dick taking photos of myself.

Anyway, I wore The Dress with a Silkbody top which is the most wonderful thing to wear next to your skin! (Thanks J) And in total contrast to that, cheap leggings from the Warehouse.  I decided on Friday to wear leggings rather than tights, and only had time to go to the Warehouse, where I figured I'd find some.  My visit there reminded me why I AM SO GLAD I SEW!  Millions of pairs of black leggings in every style imaginable, and only one style of grey, in short or long.  I wanted lighter grey marle than this, but this was all I could get.  Had I thought about it earlier I could have made a pair exactly as I wanted.  I hate shopping for clothes.

Front (click to enlarge)

Back.  Please excuse the messy garden where my apple tree used to be.

The denim jacket I wore with it, to make it a little less OTT.

These shoes are not ideal, but were the best I could do with a still-swollen ankle/foot from three weeks ago when I learned that sitting in one position for an hour watching Science Fair prize giving (Yay Georgia!) will make your foot go to sleep, and when you stand up it will flop sideways and if you then put your full weight on a rolled-in ankle you will not be able to walk properly for a few days and it will still hurt a bit and look EVEN MORE cankle-ish three weeks later.

After now having worn this dress I am even more in love with it than I was when I finished it.  It is also the most comfortable thing to wear, which is pretty unusual in a dressy dress.  I need more, for everyday wear...

Tuesday, August 21, 2012

Next

No I don't have an Alabama Chanin obsession.


Why do you ask?


ps, I didn't mean to fish for compliments on my prettiness in my last post!  We have a family occasion coming up on Friday, to which I will wear my dress.  Since that will involve styling of some description, and cameras are always present, I should get a shot of me in it then.

Friday, August 17, 2012

Finished

And I have very little further to add.

Front

Back

Bodice a little closer

Clicking the pics will bring them up a little bigger.

When I am feeling pretty enough to match my dress, I will model it ;-)

Saturday, August 4, 2012

Nearly a dress.

I couldn't resist checking out how my dress is going to look, now that all six panels are completely finished.  Here it is pinned together on my dummy.  If you click the pictures for a larger view they should be a bit clearer!


I love love love it!  I love the weight and drape, the way the surface feels when I run my hands over it, the way it looks - everything!  I can't wait to wear it.  Even though it's a pretty dressy sort of dress I will wear it any chance I get.  Coffee in town with friends is good enough.  Possibly so is a trip to the supermarket to get toilet paper.  Anything involving the twins and their sticky fingers is NOT!


And just for Keely, here's a progress shot of the coat I am making for her.  Being a frantically busy post grad student she does not have time to make a wool coat. I really like working with lovely wool, so I said I'd make it for her.  In exchange she keeps me supplied with peanut butter based chocolate confectionery.  Good system!

This is the pocket opening, which is set into a side seam.  I am pick stitching the opening to hold everything flat, and add a subtle detail.  The chalk line and wonky looking pins are marking where each stitch goes (where each pin goes into the fabric is actually even, but boy they look wild in this shot!).  After the chalk is brushed away it looks really nice.


Keely, your lining is still evil.  Just so you know.

Wednesday, July 25, 2012

When one has 100 or so spare hours...

.... naturally, one does this:

Which looks like this, when you get up close:


My Alabama Chanin tank dress is coming along just nicely, and I reckon the 100 hours is probably going to be a bit of an under estimate by the time I'm done.  I find the completely hand worked project is incredibly restful, which in my busy noisy household is kind of nice.


Meanwhile, because it is July it must be time to start thinking about Christmas.  One of the twins' kindy teachers admired my fingerless gloves, so I figured a pair for each of the three of them would be a nice gift at the end of the year.  This pile is destined to become several pairs of Alabama Chanin style fingerless gloves.


The one pair I have actually begun to stitch has got this far.  Being small and portable they're an ideal craft night activity.  The design is drawn onto Press'n'Seal which will be pulled out after stitching.

Sewing machine is eyeing me reproachfully every time I sit at my desk to stitch.